Optimizing Windows VM performance on QEMU and KVM
Configuring VirtIO drivers, Hyper-V enlightenments, hybrid-core CPU pinning, hugepages, NVMe passthrough, multi-queue networking, and display tuning for Windows guests on Linux KVM.
Running a Windows guest virtual machine on a Linux host is straightforward with standard type-2 hypervisors like VirtualBox, but those setups introduce noticeable overhead in CPU execution, disk I/O, and graphics latency.
Running applications on bare-metal KVM (Kernel-based Virtual Machine) achieves near-native performance. Unlocking that potential requires paravirtualized VirtIO drivers, Hyper-V enlightenments, and targeted guest OS optimizations. This guide then goes beyond defaults: CPU pinning for hybrid processors, hugepage memory backing, NVMe partition passthrough, and multi-queue networking.
Prerequisites and host preparation
This guide covers configuration and performance tweaks using Virtual Machine Manager (virt-manager) on Linux hosts.
Ensure the virtualization stack is installed and running on your Linux host:
sudo systemctl enable --now libvirtd.service
sudo systemctl status libvirtd.service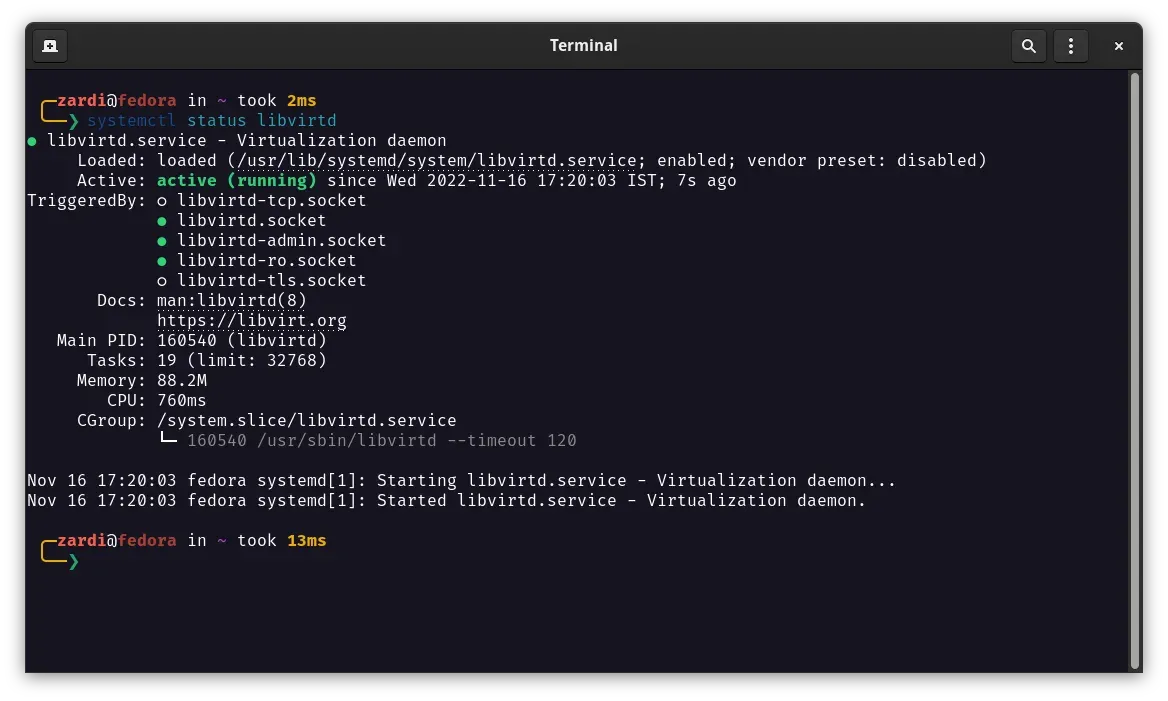
Before creating virtual machines, add your user account to the relevant virtualization groups to avoid permission prompts:
sudo usermod -aG libvirt $USER
sudo usermod -aG libvirt-qemu $USER
sudo usermod -aG kvm $USER
sudo usermod -aG input $USER
sudo usermod -aG disk $USER
Download the necessary installation media before proceeding:
- A clean Windows 10 or 11 installation ISO.
- The latest stable
virtio-win.isodriver package from the official Fedora VirtIO repository.
Virtual machine configuration
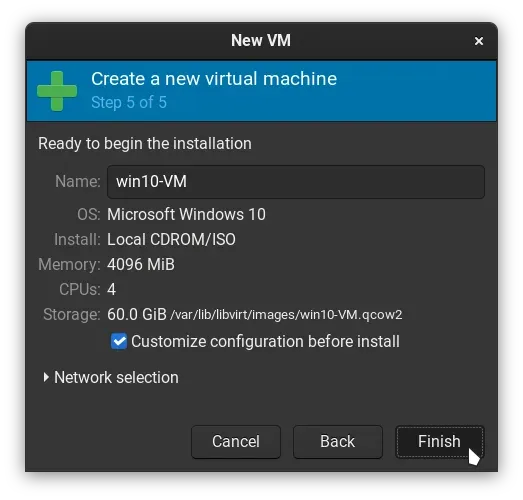
When creating the new virtual machine in Virtual Machine Manager, check Customize configuration before install on the final creation step.
Storage bus configuration
In the customization window, navigate to your VM disk storage and change the Disk bus from SATA or IDE to VirtIO.
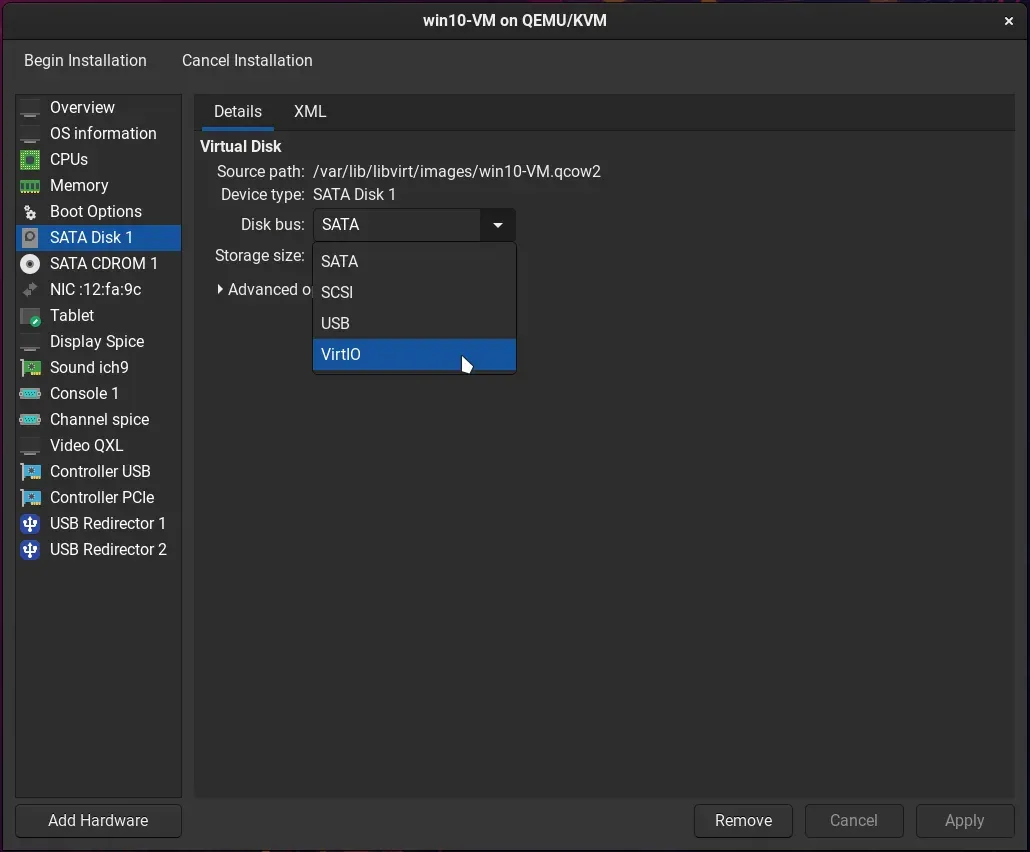
Dedicated storage drive passthrough offers the highest throughput if a spare physical NVMe or SATA drive is available. For file-backed storage, VirtIO with QCOW2 or raw images provides substantial I/O improvements over emulated SATA. The NVMe partition passthrough section covers this setup in depth.
Network and video devices
Change the Network Interface device model to virtio to enable paravirtualized network throughput and reduced host CPU overhead.
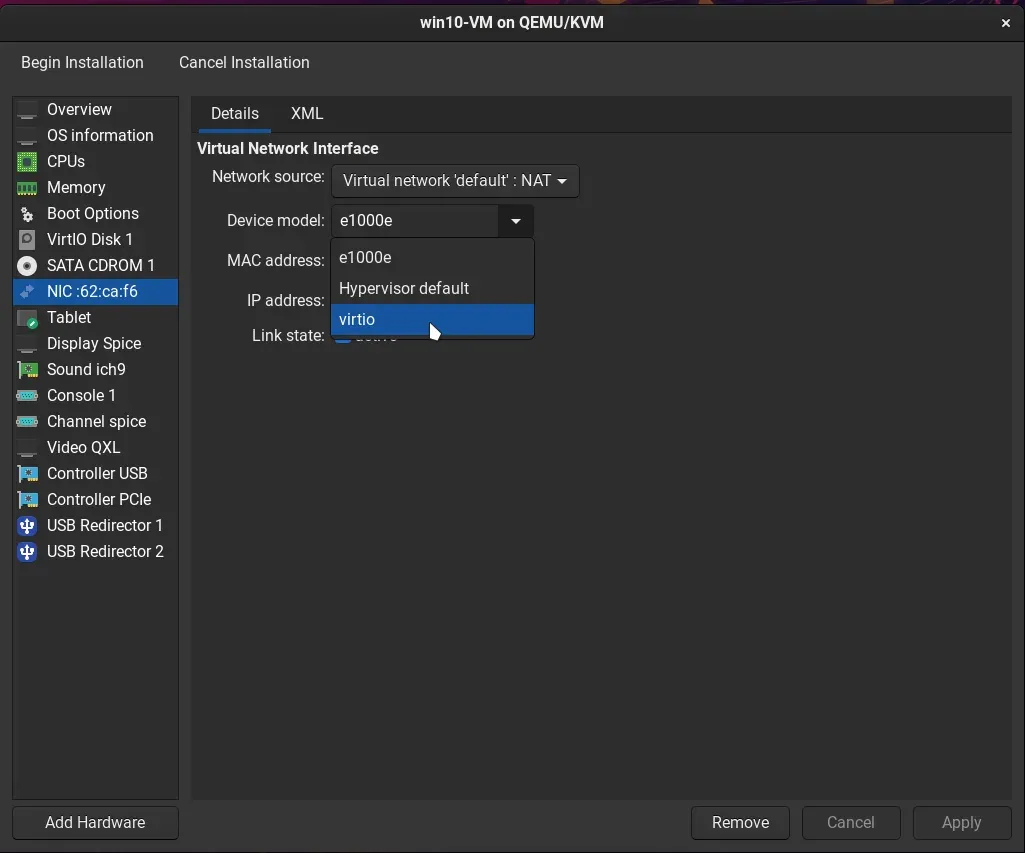
For video output without dedicated PCIe GPU passthrough, select QXL as the video model.
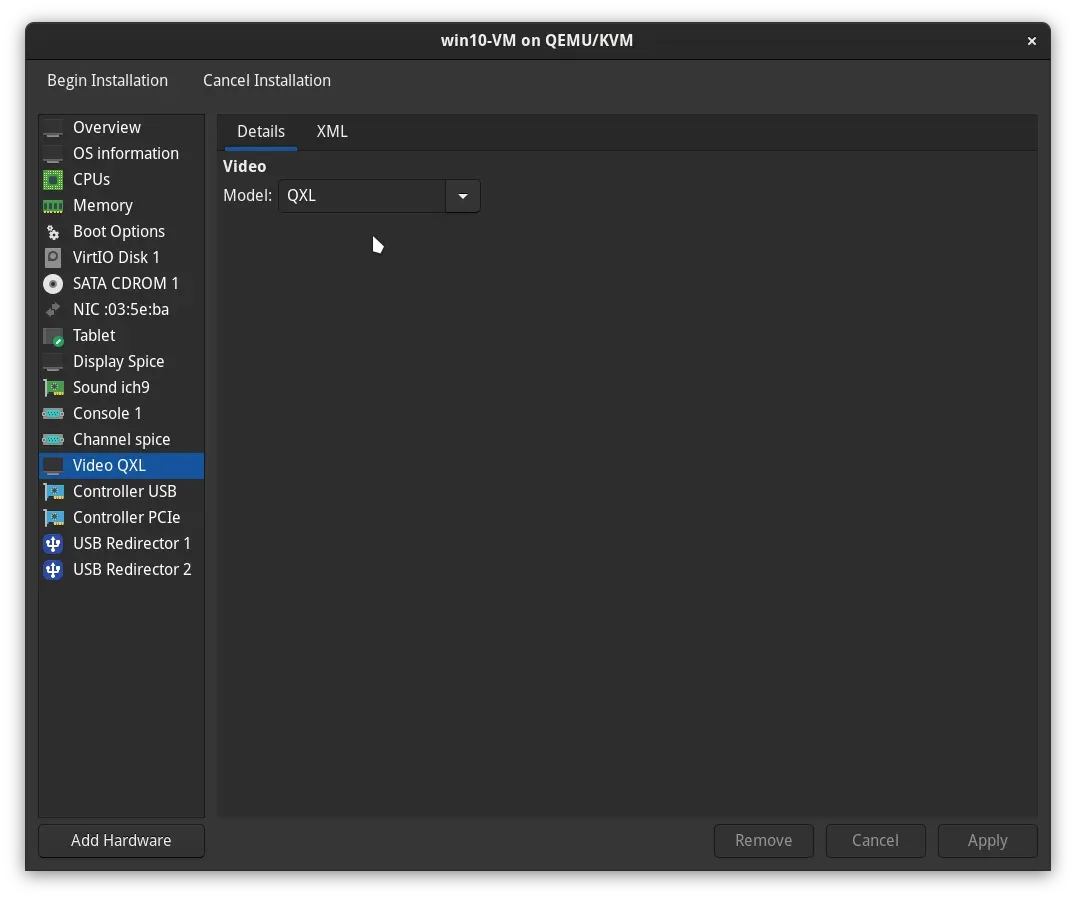
Attaching VirtIO driver media
To load the storage driver during Windows setup, attach the driver ISO as a secondary CD-ROM device:
- Click Add Hardware in the bottom-left corner.
- Under Storage, select Select or create custom storage and click Manage.
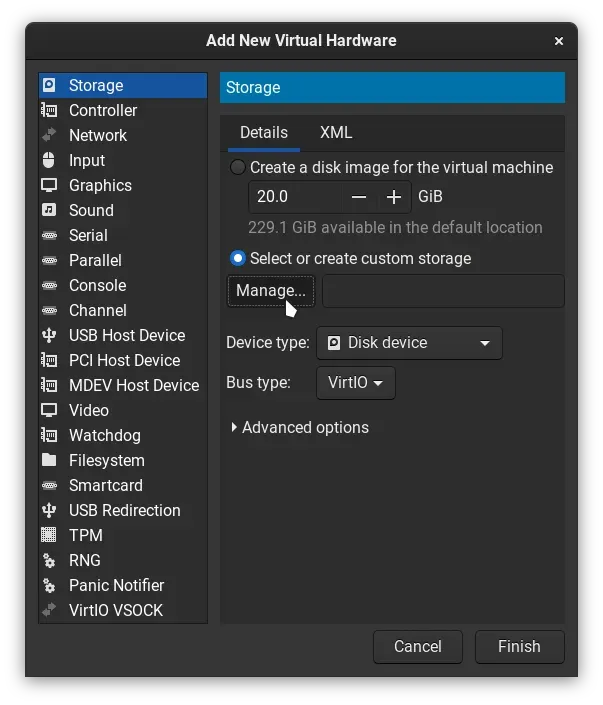
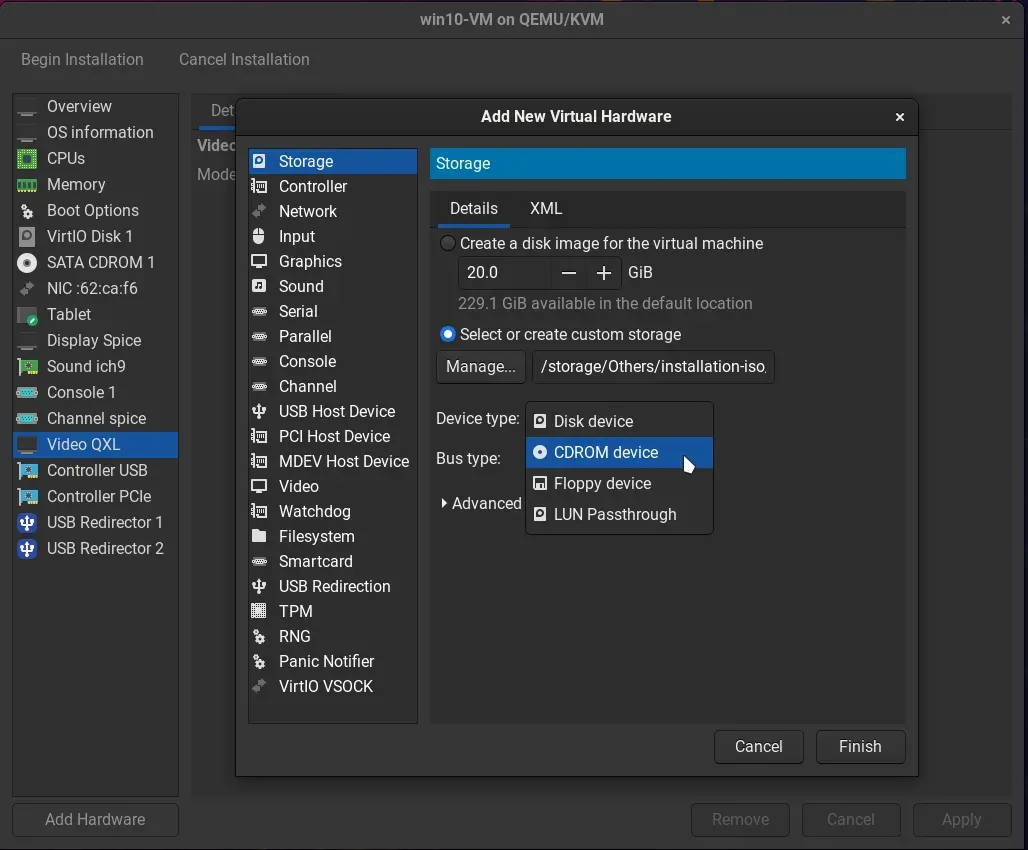
- Locate the downloaded
virtio-win.isofile. - Set the device type to CDROM device and the bus to
SATAorIDE.
- Click Begin Installation at the top left to boot the virtual machine.
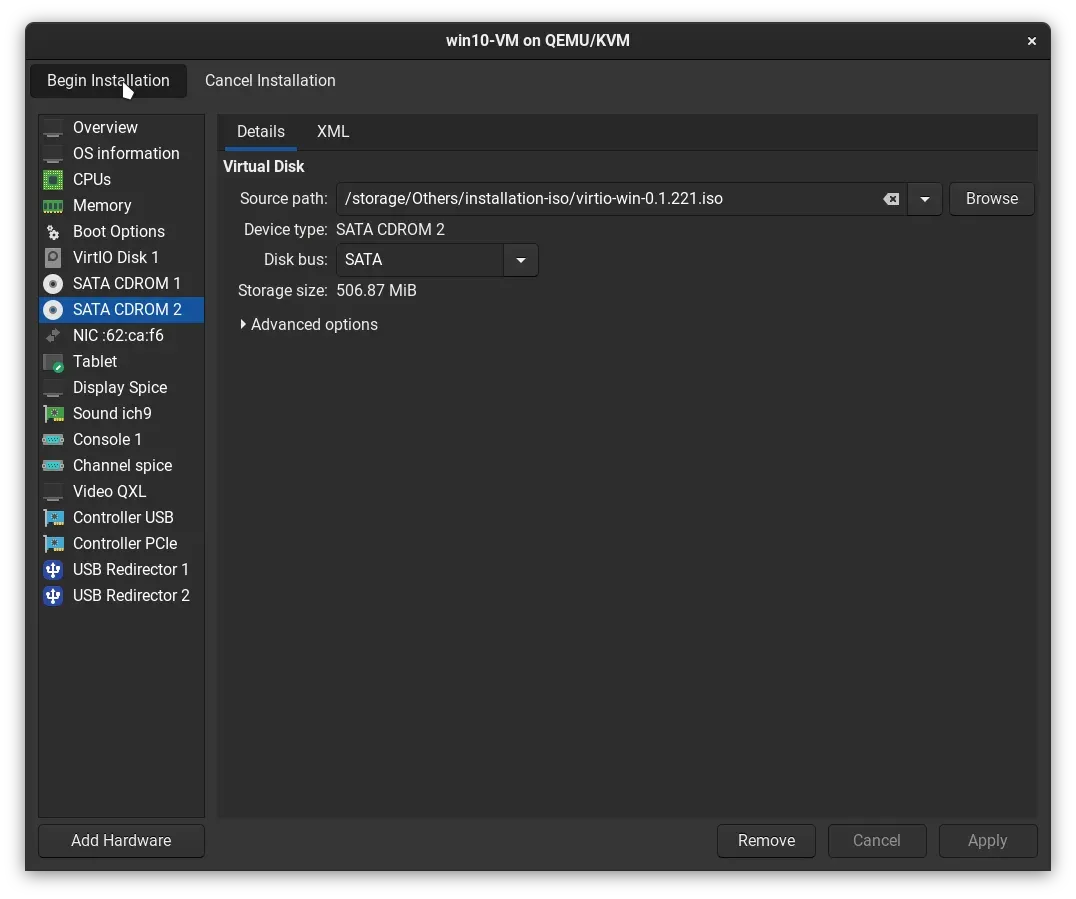
Windows setup and driver injection
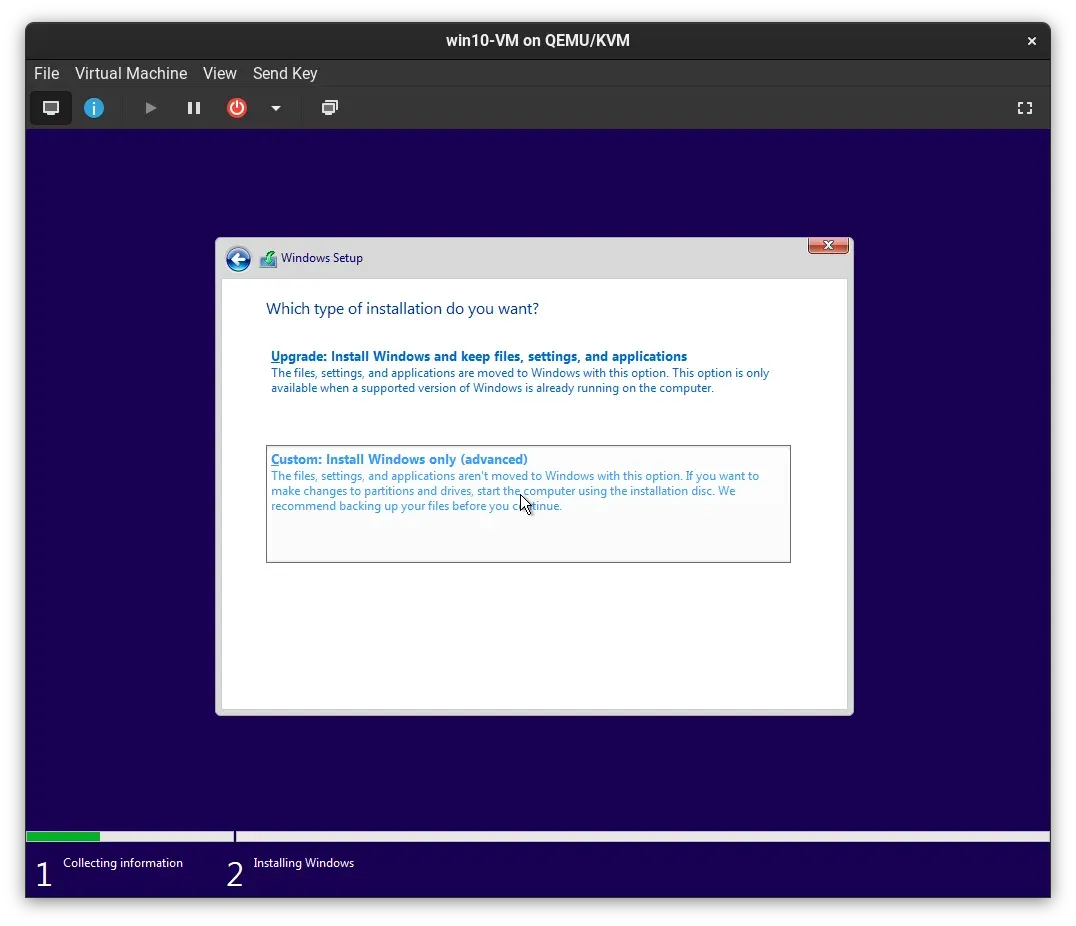
When the Windows installer starts, select Custom: Install Windows only (advanced).
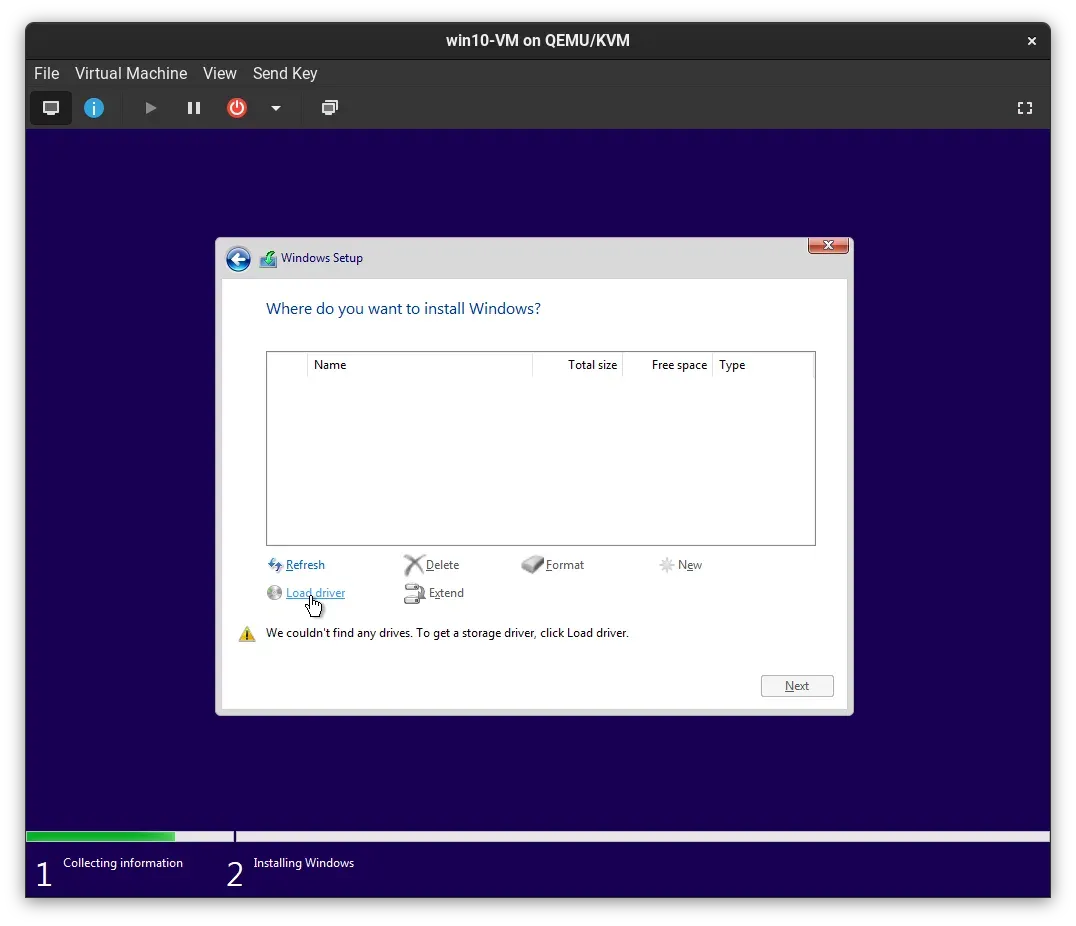
The drive list will appear empty because Windows does not bundle VirtIO SCSI drivers natively. Click Load driver.
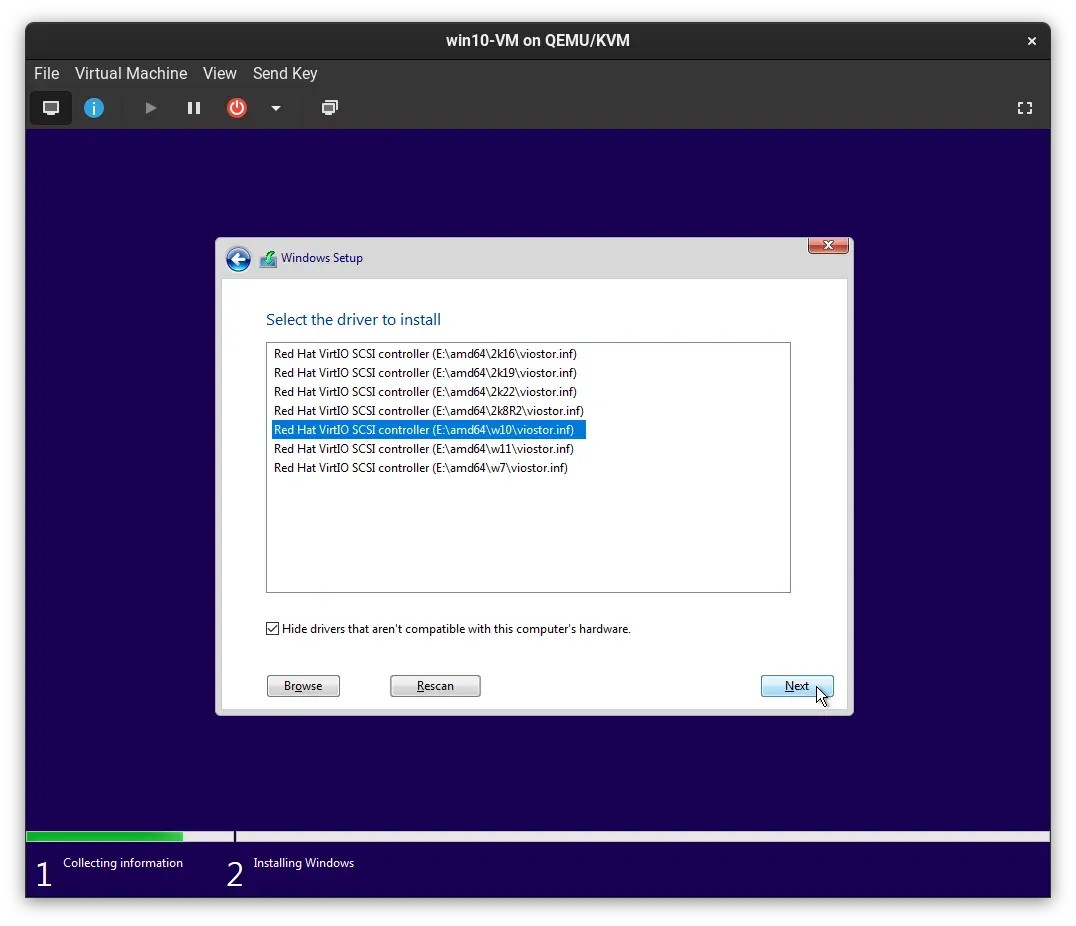
Browse to the attached virtio-win CD-ROM drive and select the storage driver directory matching your target Windows architecture (for example, viostor\w10\amd64).
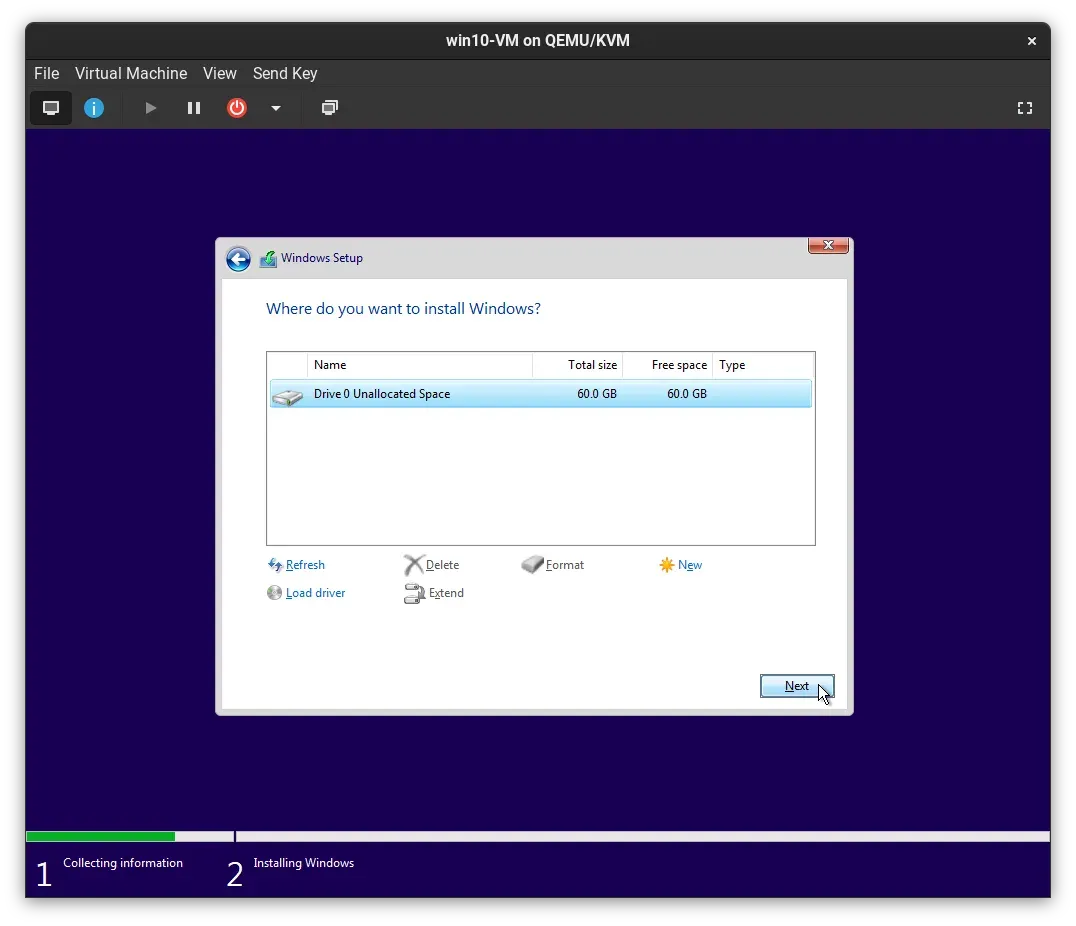
Once the driver loads, the virtual disk will appear immediately. Proceed with the standard partition creation and OS installation.
Guest tools and SPICE integration
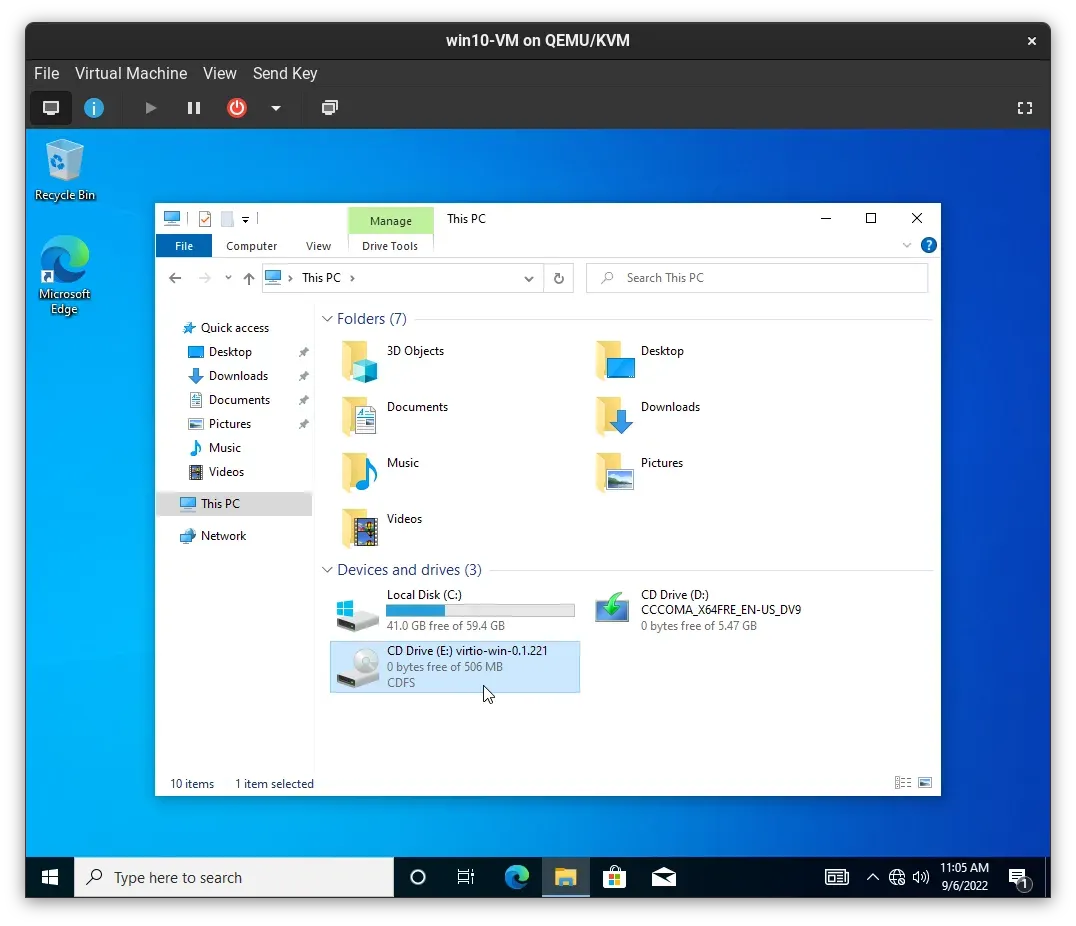
After completing the initial Windows setup and reaching the desktop, open File Explorer and navigate to the mounted virtio-win CD drive.
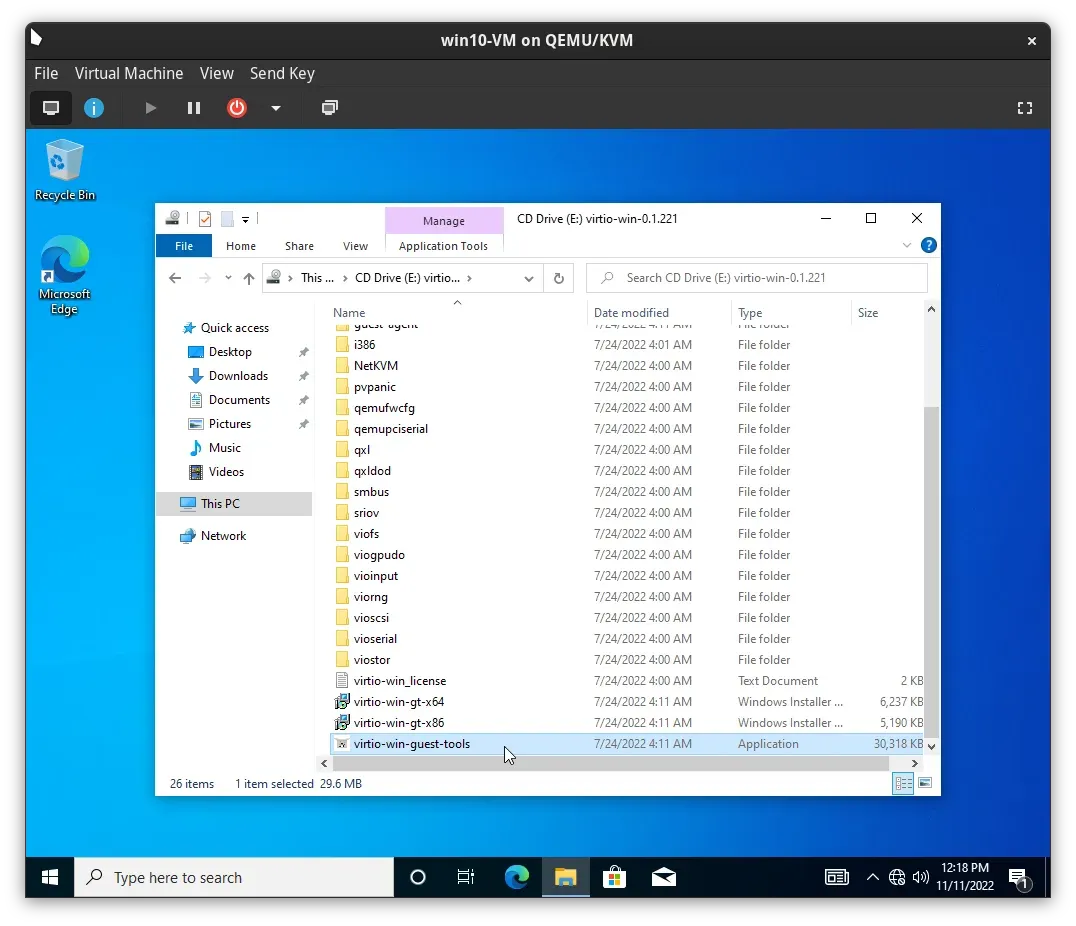
Execute virtio-win-guest-tools.exe to install all remaining paravirtualized drivers, including network (NetKVM), balloon memory management, and serial communication.
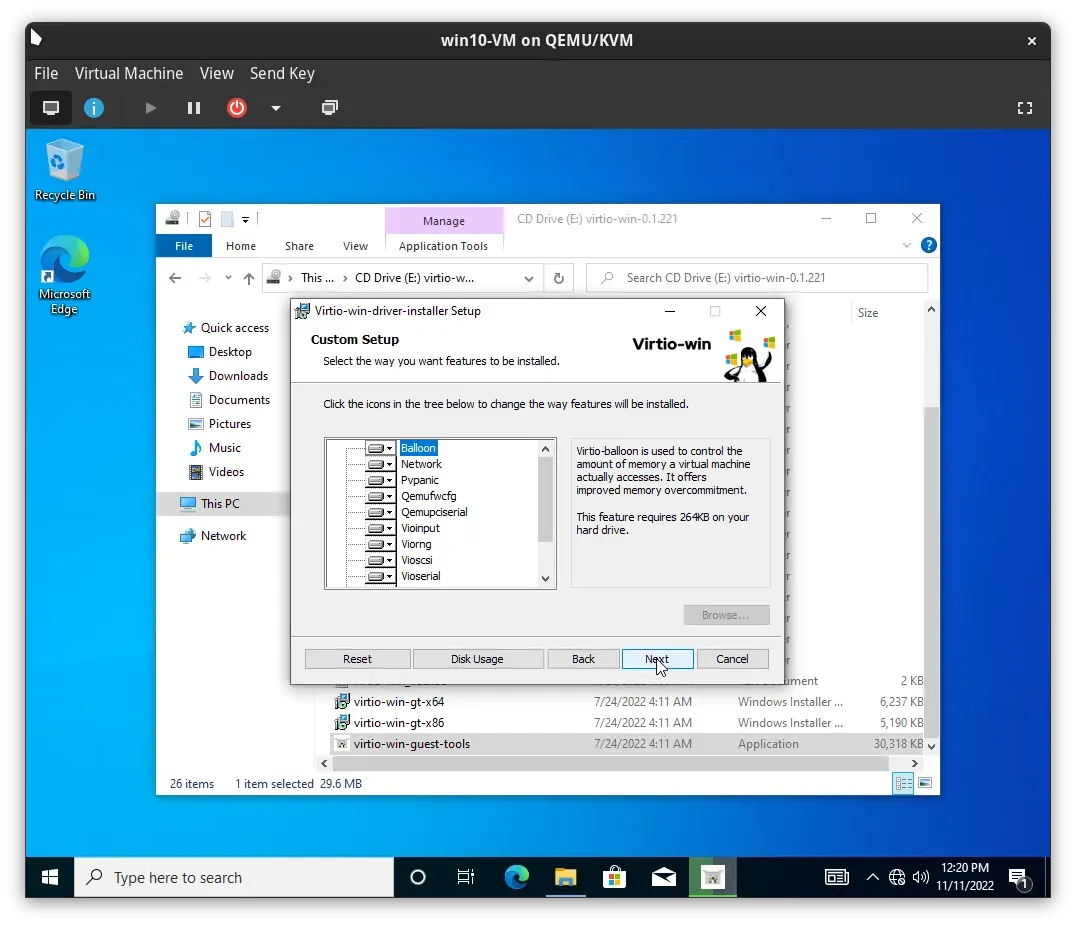
Accept the default selections and complete the driver package installation.
Installing SPICE guest tools
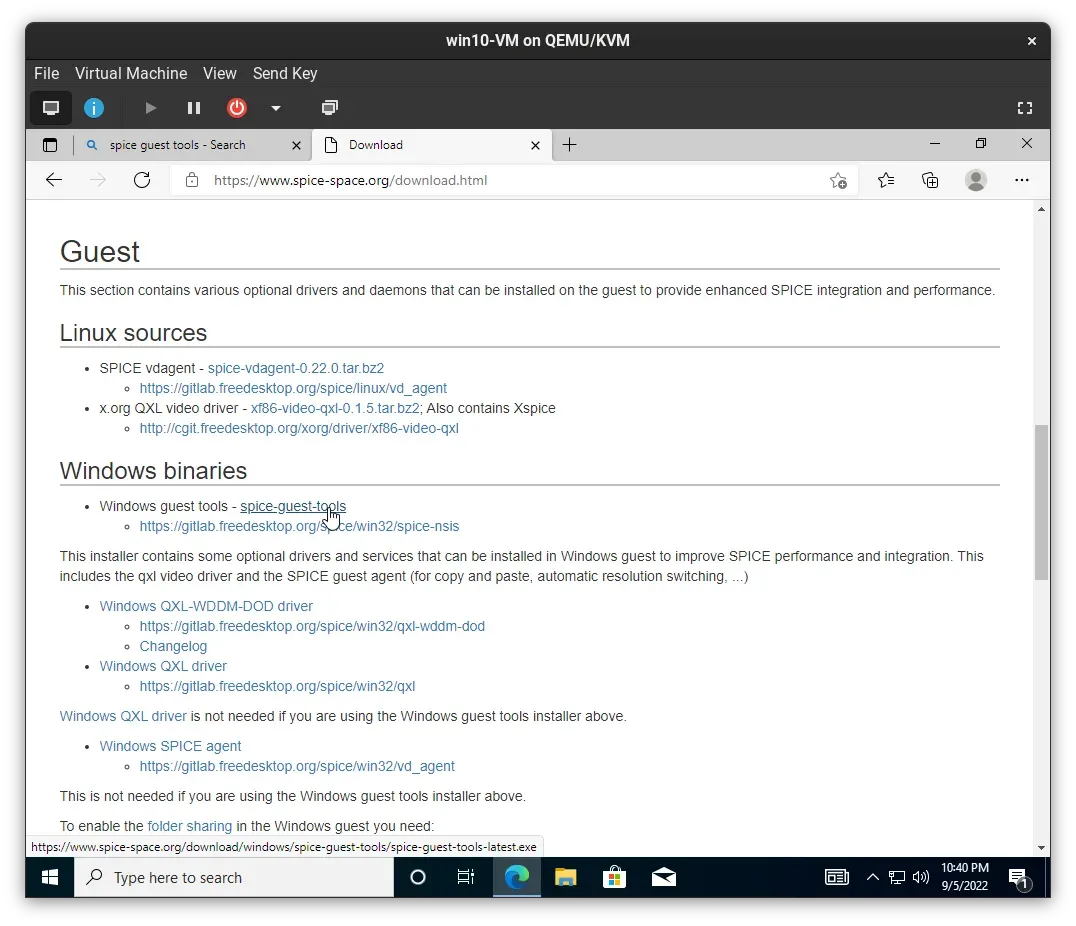
To enable dynamic display resizing, clipboard sharing, and smooth mouse pointer integration, download the latest spice-guest-tools package from the official SPICE repository.
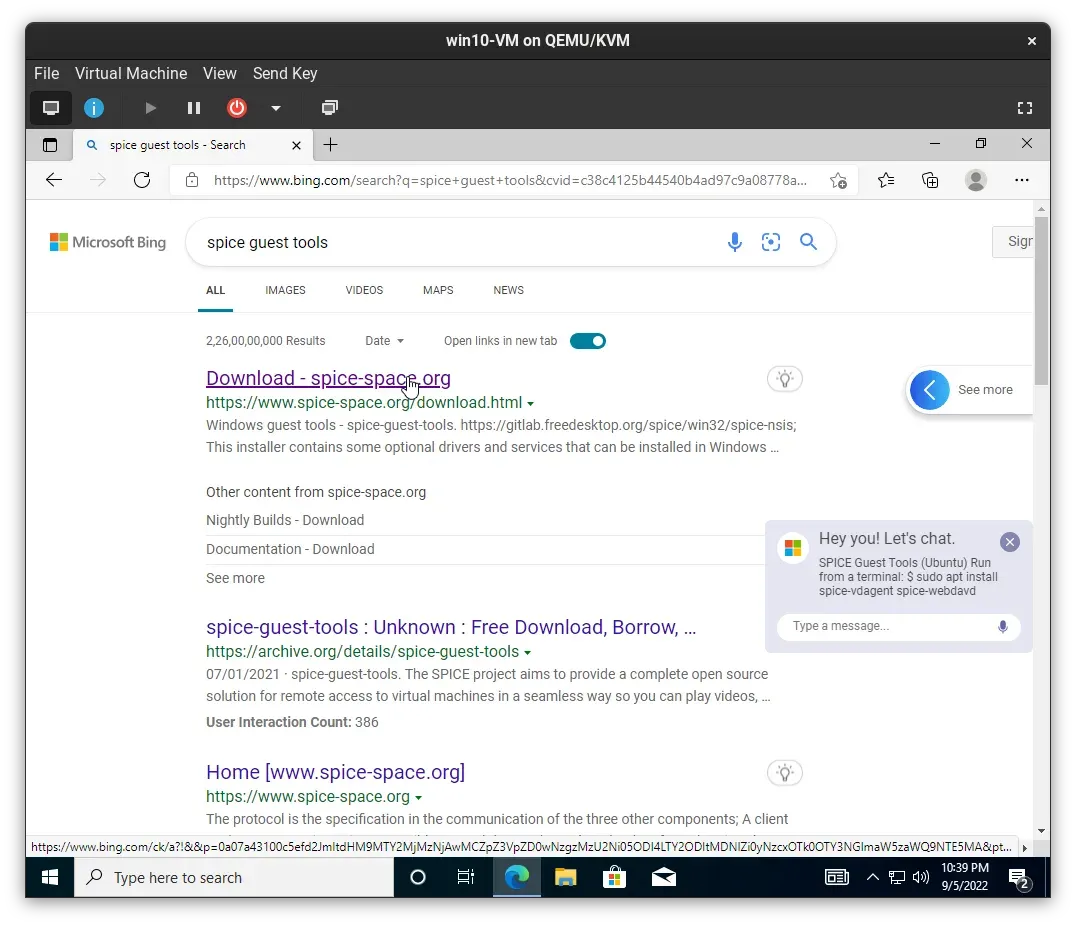
Download and run the spice-guest-tools Windows installer package.
Hardware channels and hypervisor features
Shut down the guest to add management channels and hypervisor enlightenments.
QEMU guest agent and watchdog
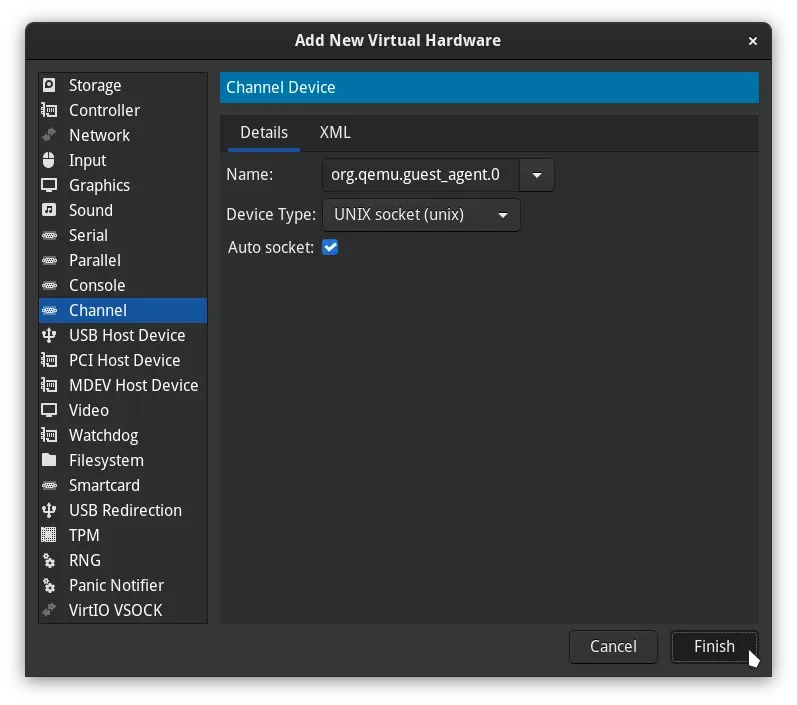
In virt-manager, add a new Channel device with the name org.qemu.guest_agent.0. This enables the host to perform clean ACPI shutdowns, query IP addresses, and freeze filesystems for consistent snapshots.
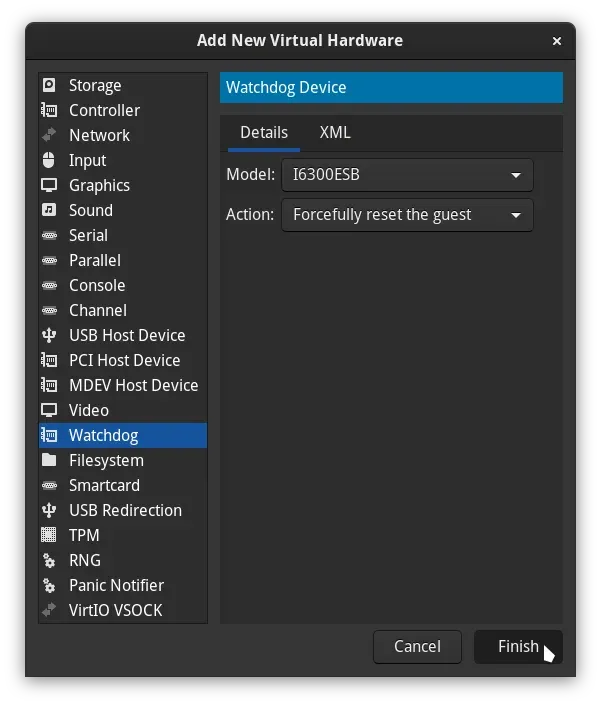
Optionally, add a watchdog device (such as i6300esb) with the default reset action to automatically reboot the guest if the kernel hangs.
Hyper-V enlightenments configuration
Hyper-V enlightenments allow KVM to emulate Windows-specific hypervisor interfaces, reducing virtualization overhead and clock synchronization drift.
Enable direct XML editing in virt-manager preferences:
- Open Edit -> Preferences from the main Virtual Machine Manager menu.
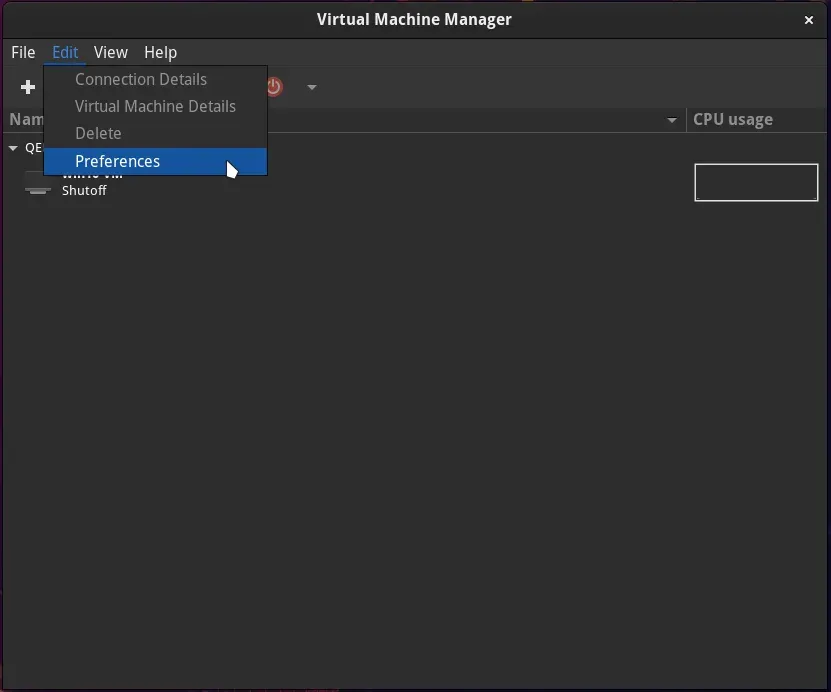
- Check Enable XML editing.
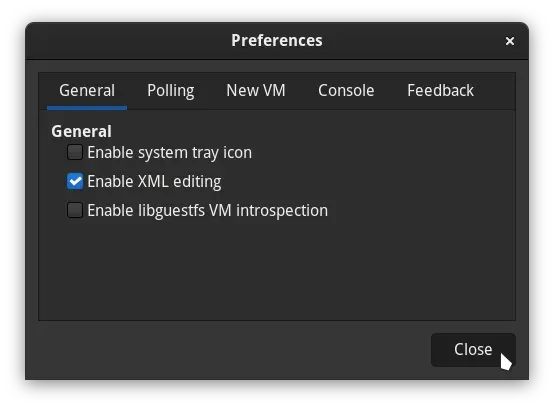
- Open the VM details, switch to the XML tab, and add the following
<hyperv>block inside<features>:
<features>
  <hyperv>
    <relaxed state='on'/>
    <vapic state='on'/>
    <spinlocks state='on' retries='8191'/>
    <vpindex state='on'/>
    <runtime state='on'/>
    <synic state='on'/>
    <stimer state='on'>
      <direct state='on'/>
    </stimer>
    <frequencies state='on'/>
  </hyperv>
</features>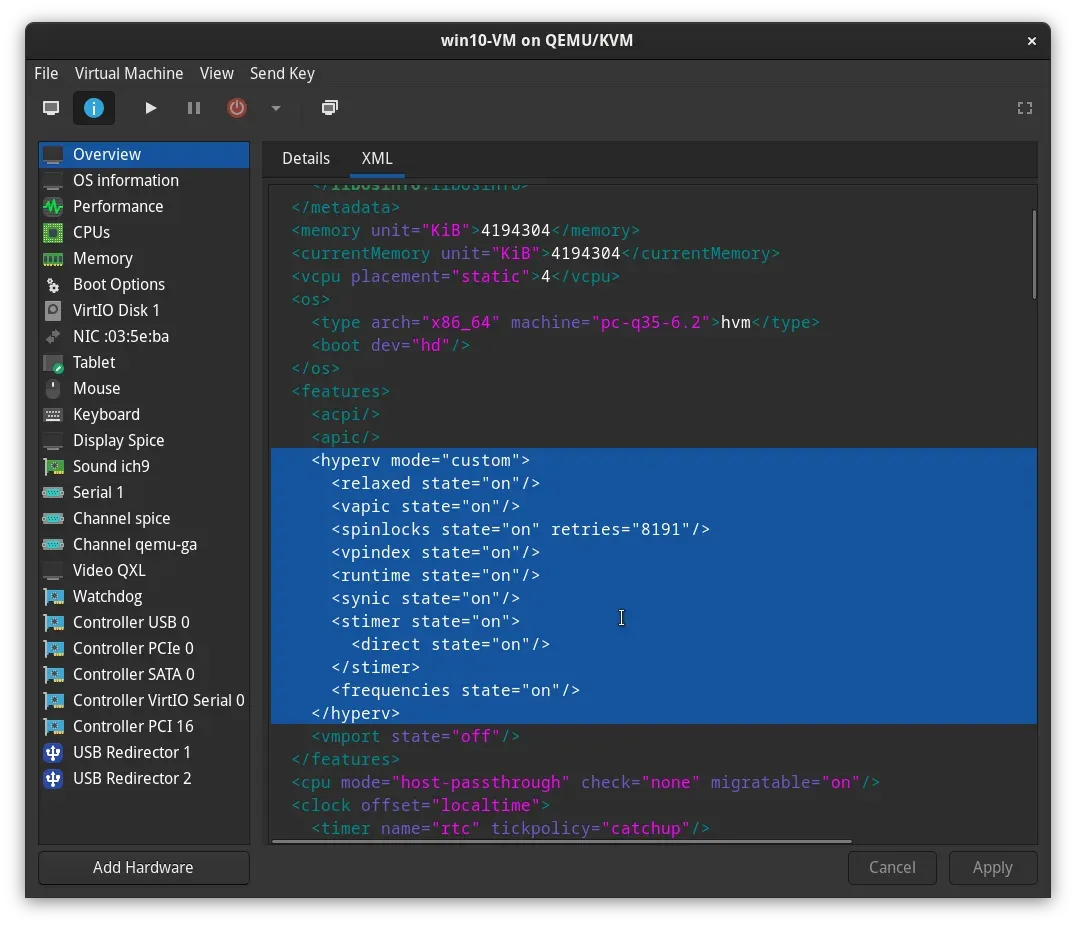
- Add the
hypervclocktimer inside the<clock>section:
<clock offset='localtime'>
  <timer name='hypervclock' present='yes'/>
</clock>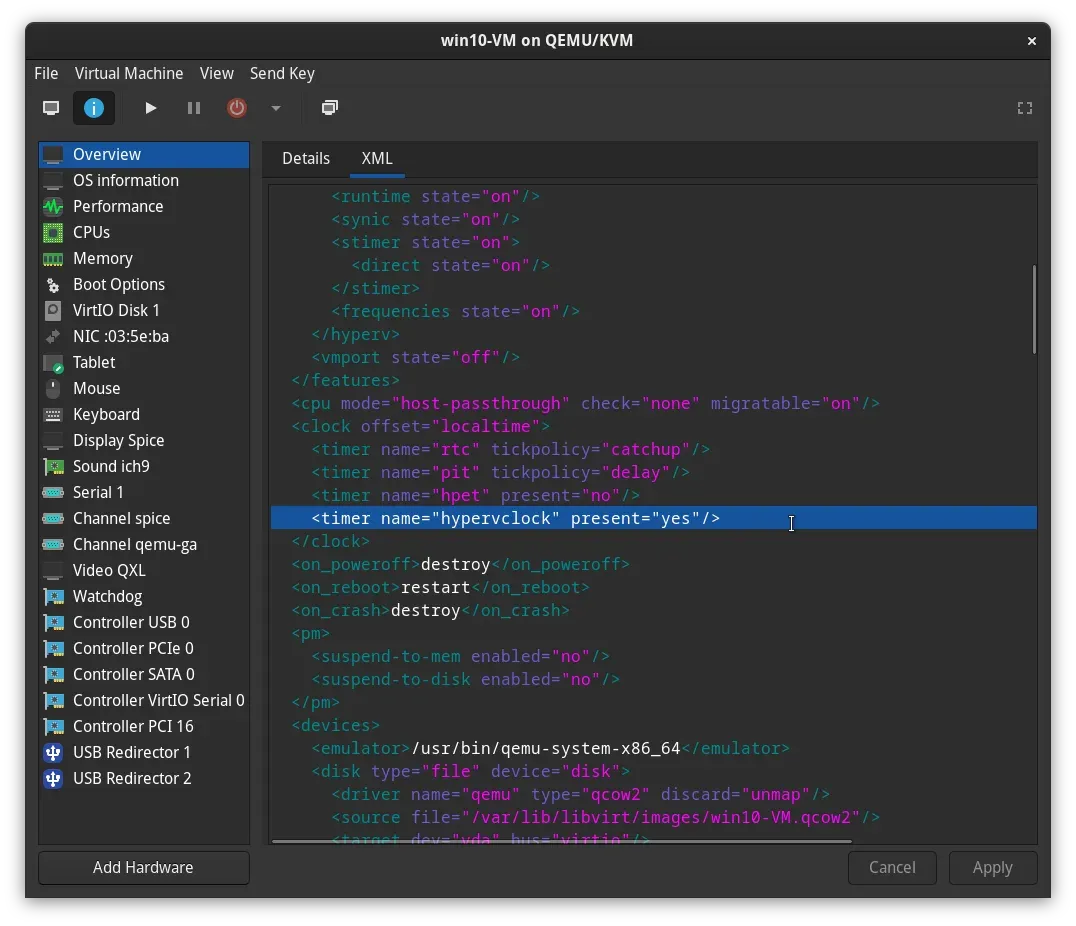
CPU pinning on hybrid processors
Modern hybrid CPUs such as the AMD Ryzen AI 7 350 mix two core types: high-frequency Zen 4 performance cores and efficiency-oriented Zen 4c cores capped at lower clocks. Without explicit pinning, the Windows scheduler may migrate high-priority guest threads onto the slower efficiency cores, producing non-deterministic performance and micro-stutters. Strict isolation fixes this: guest vCPUs live on the performance cores, and host-side QEMU overhead is relegated to the efficiency cores.
Reading the core topology
Inspect the topology with lscpu -e or lstopo. On this 8-core/16-thread Ryzen AI 7 350, the physical cores alternate between the two types:
- Zen 4 performance cores (5.09 GHz): physical cores 0, 2, 4, and 6, with logical threads 0/8, 2/10, 4/12, and 6/14.
- Zen 4c efficiency cores (3.5 GHz): physical cores 1, 3, 5, and 7, with logical threads 1/9, 3/11, 5/13, and 7/15.
Pinning the guest vCPUs
Pin each guest vCPU to one performance-core thread pair, and pin the emulator threads (interrupt steering, I/O coordination) to the efficiency cores:
<vcpu placement='static'>8</vcpu>
<cputune>
  <vcpupin vcpu='0' cpuset='0'/>
  <vcpupin vcpu='1' cpuset='8'/>
  <vcpupin vcpu='2' cpuset='2'/>
  <vcpupin vcpu='3' cpuset='10'/>
  <vcpupin vcpu='4' cpuset='4'/>
  <vcpupin vcpu='5' cpuset='12'/>
  <vcpupin vcpu='6' cpuset='6'/>
  <vcpupin vcpu='7' cpuset='14'/>
  <emulatorpin cpuset='1,9,3,11,5,13,7,15'/>
</cputune>
The <topology> declaration must match the pinned allocation: one socket, 4 cores, 2 threads each. Combine it with host-passthrough, cache passthrough, and the topoext feature so the guest sees the honest cache and frequency layout:
<cpu mode='host-passthrough' check='none' migratable='on'>
  <topology sockets='1' dies='1' clusters='1' cores='4' threads='2'/>
  <cache mode='passthrough'/>
  <feature policy='require' name='topoext'/>
</cpu>
Hugepage memory backing
Optimized CPU cycles are wasted without low-latency memory access. Moving the guest from standard 4 KB pages to 2 MB hugepages reduces translation lookaside buffer (TLB) misses and produces a deterministic memory access pattern under heavy workloads.
Static reservation at boot
On atomic filesystems such as Fedora Silverblue, reserve the pages at the kernel level so they cannot fragment after boot:
rpm-ostree kargs --append="hugepagesz=2M" --append="hugepages=8200"Dynamic allocation with libvirt hooks
On traditional distributions, a libvirt hook can allocate hugepages just before the guest starts and release them after it stops. The prepare phase syncs, drops the page cache, compacts memory, and then allocates:
#!/bin/bash
VM_NAME="windows-11"
HUGEPAGES_NEEDED=8200

if [ "$1" == "$VM_NAME" ]; then
    if [ "$2" == "prepare" ]; then
        sync
        echo 3 > /proc/sys/vm/drop_caches
        echo 1 > /proc/sys/vm/compact_memory
        sysctl -w vm.nr_hugepages=$HUGEPAGES_NEEDED
        sleep 1
    fi

    if [ "$2" == "release" ]; then
        sysctl -w vm.nr_hugepages=0
    fi
fi
The sleep 1 is mandatory: without it, libvirt races the allocator and the start fails with Cannot allocate memory. Restart libvirtd after creating the hook file.
Shared memory backing XML
The memory backing block below enables hugepages and, through memfd shared access, the zero-copy mechanism that VirtioFS shared folders use for host-guest file transfer:
<memoryBacking>
  <hugepages/>
  <locked/>
  <source type='memfd'/>
  <access mode='shared'/>
</memoryBacking>
<devices>
  <memballoon model='none'/>
</devices>
Disable the memory balloon driver: dynamic resizing is incompatible with stable hugepage allocation.
NVMe partition passthrough
File-backed virtual disks pay a double filesystem tax: every guest write journals on both the Windows NTFS layer and the host filesystem. Raw partition passthrough removes the host layer entirely, letting the guest issue I/O directly against the block device.
Locate the persistent device identifier
The kernel enumerates NVMe controllers in a different order across reboots, so /dev/nvmeXnY paths are not stable. Always reference the partition through /dev/disk/by-id:
ls -l /dev/disk/by-id/ | grep nvmeHigh-performance disk XML
Point the disk at the persistent identifier, use io_uring for asynchronous I/O, and align the block sizes to 4096 bytes to avoid read-modify-write penalties on modern SSDs:
<disk type='block' device='disk'>
  <driver name='qemu' type='raw' cache='none' io='io_uring' discard='unmap' queues='8'/>
  <source dev='/dev/disk/by-id/nvme-STABLE_ID_HERE-part2'/>
  <target dev='vda' bus='virtio'/>
  <blockio logical_block_size='4096' physical_block_size='4096'/>
</disk>
Multi-queue networking
A standard virtual NIC pushes every packet through a single vCPU, which saturates during high-throughput transfers. Multi-queue distributes network interrupts across all guest cores.
Host-side buffer tuning
Raise the host network buffers and make the settings permanent:
echo "net.core.rmem_max=4194304" | sudo tee /etc/sysctl.d/99-vm-network.conf
echo "net.core.wmem_max=4194304" | sudo tee -a /etc/sysctl.d/99-vm-network.conf
sudo sysctl -p /etc/sysctl.d/99-vm-network.conf
Queue configuration
Enable vhost with 8 queues and a deep receive ring. Keep tx_queue_size at the default 256: raising the transmit ring to 1024 hard-locks the host on certain kernel and QEMU combinations, while rx_queue_size=1024 safely absorbs incoming bursts:
<interface type='network'>
  <source network='default'/>
  <model type='virtio'/>
  <driver name='vhost' queues='8' rx_queue_size='1024'/>
</interface>
Inside the Windows guest, open Device Manager, confirm Receive Side Scaling (RSS) is enabled on the VirtIO adapter, and set Max RSS Queues to 8.
Display protocol tuning
The display protocol choice balances CPU overhead against visual fidelity. On the Ryzen AI integrated graphics, the SPICE/QXL stack provides a lower-latency, more responsive desktop than software-encoded remote streams at resolutions up to 1920x1200:
- SPICE/QXL: the high-performance choice for integrated graphics, with a direct framebuffer path that feels snappier than encoded streams at non-4K resolutions.
- Virtio-GPU with RDP: the better choice at 4K, where RDP video-stream compression hides bandwidth limitations at the cost of subtle encoding latency.
Two guest-side tweaks complete the setup. Set QXL VRAM to 256 MB for high-resolution triple buffering, and create a DWORD named DWMFRAMEINTERVAL at HKEY_LOCAL_MACHINE\SYSTEM\CurrentControlSet\Control\Terminal Server\WinStations\RDP-Tcp with the decimal value 15 to unlock 60 FPS rendering over RDP.
For artifact-free Remmina sessions, set Relax order checks on, UDP off (forcing reliable TCP delivery), and Glyph cache on to reduce font-rendering overhead.
Operating system storage optimizations
Reclaim disk footprint and reduce host image inflation by tuning guest maintenance settings.
Disable hibernation
Virtual machine state can be managed directly by KVM snapshots. Disabling Windows hibernation removes hiberfil.sys, immediately saving gigabytes of disk space:
powercfg -h off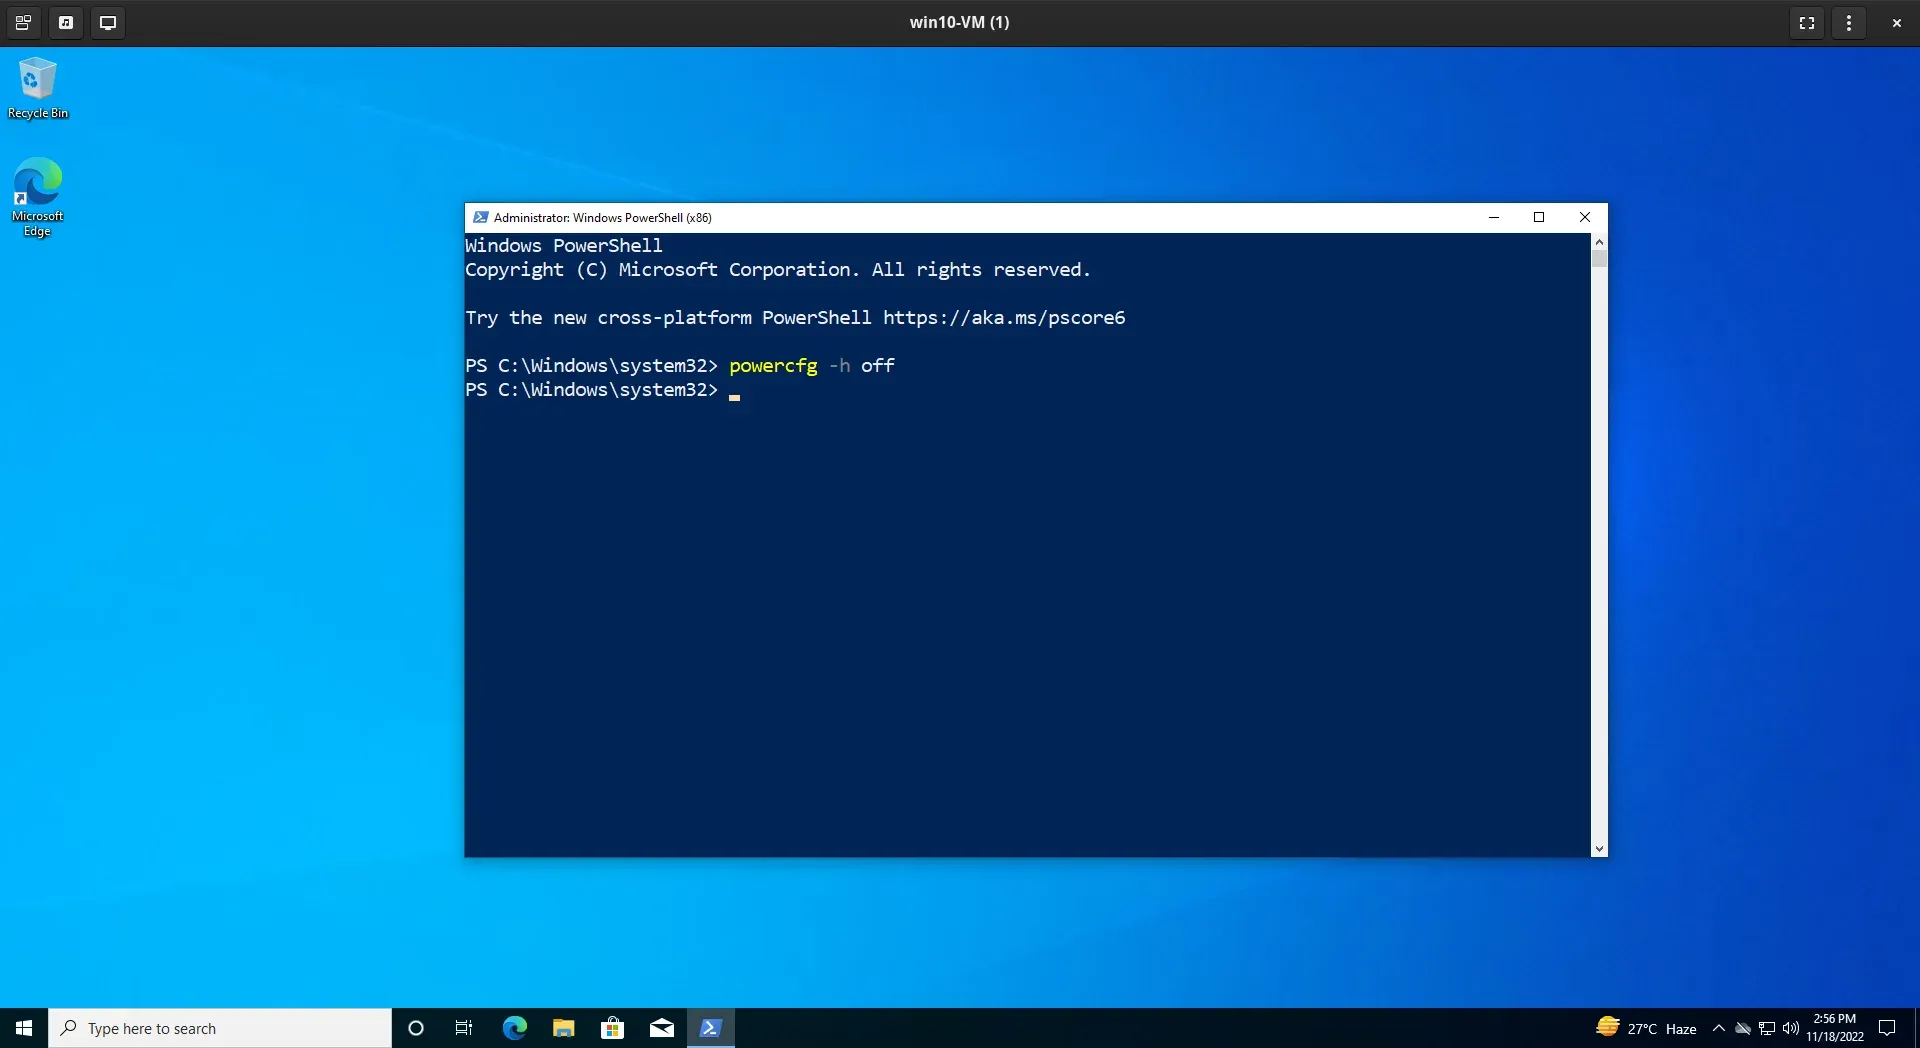
Component store cleanup
Clean up superseded update packages using the Deployment Image Servicing and Management (DISM) tool in an elevated command prompt:
dism.exe /online /Cleanup-Image /StartComponentCleanup /ResetBase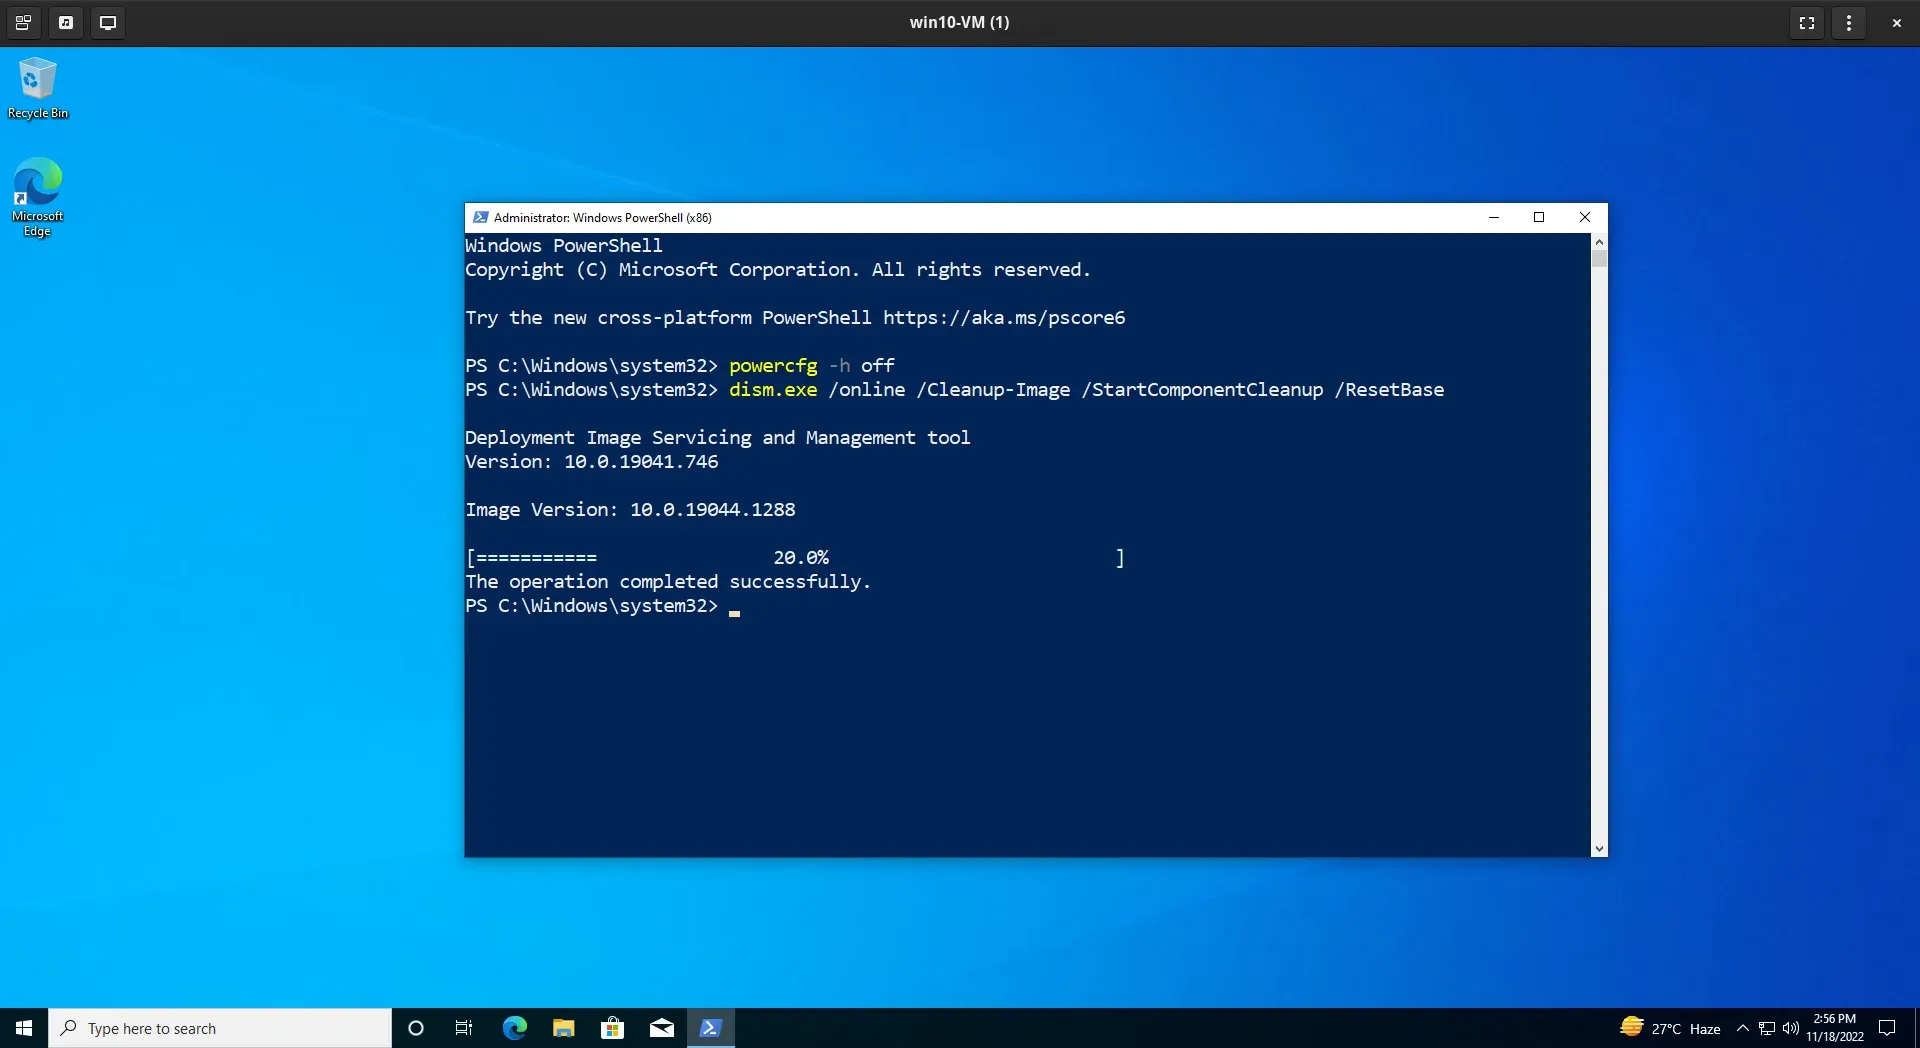
Disk cleanup automation
Pre-configure Windows Disk Cleanup with all cleaning categories:
cleanmgr /sageset:0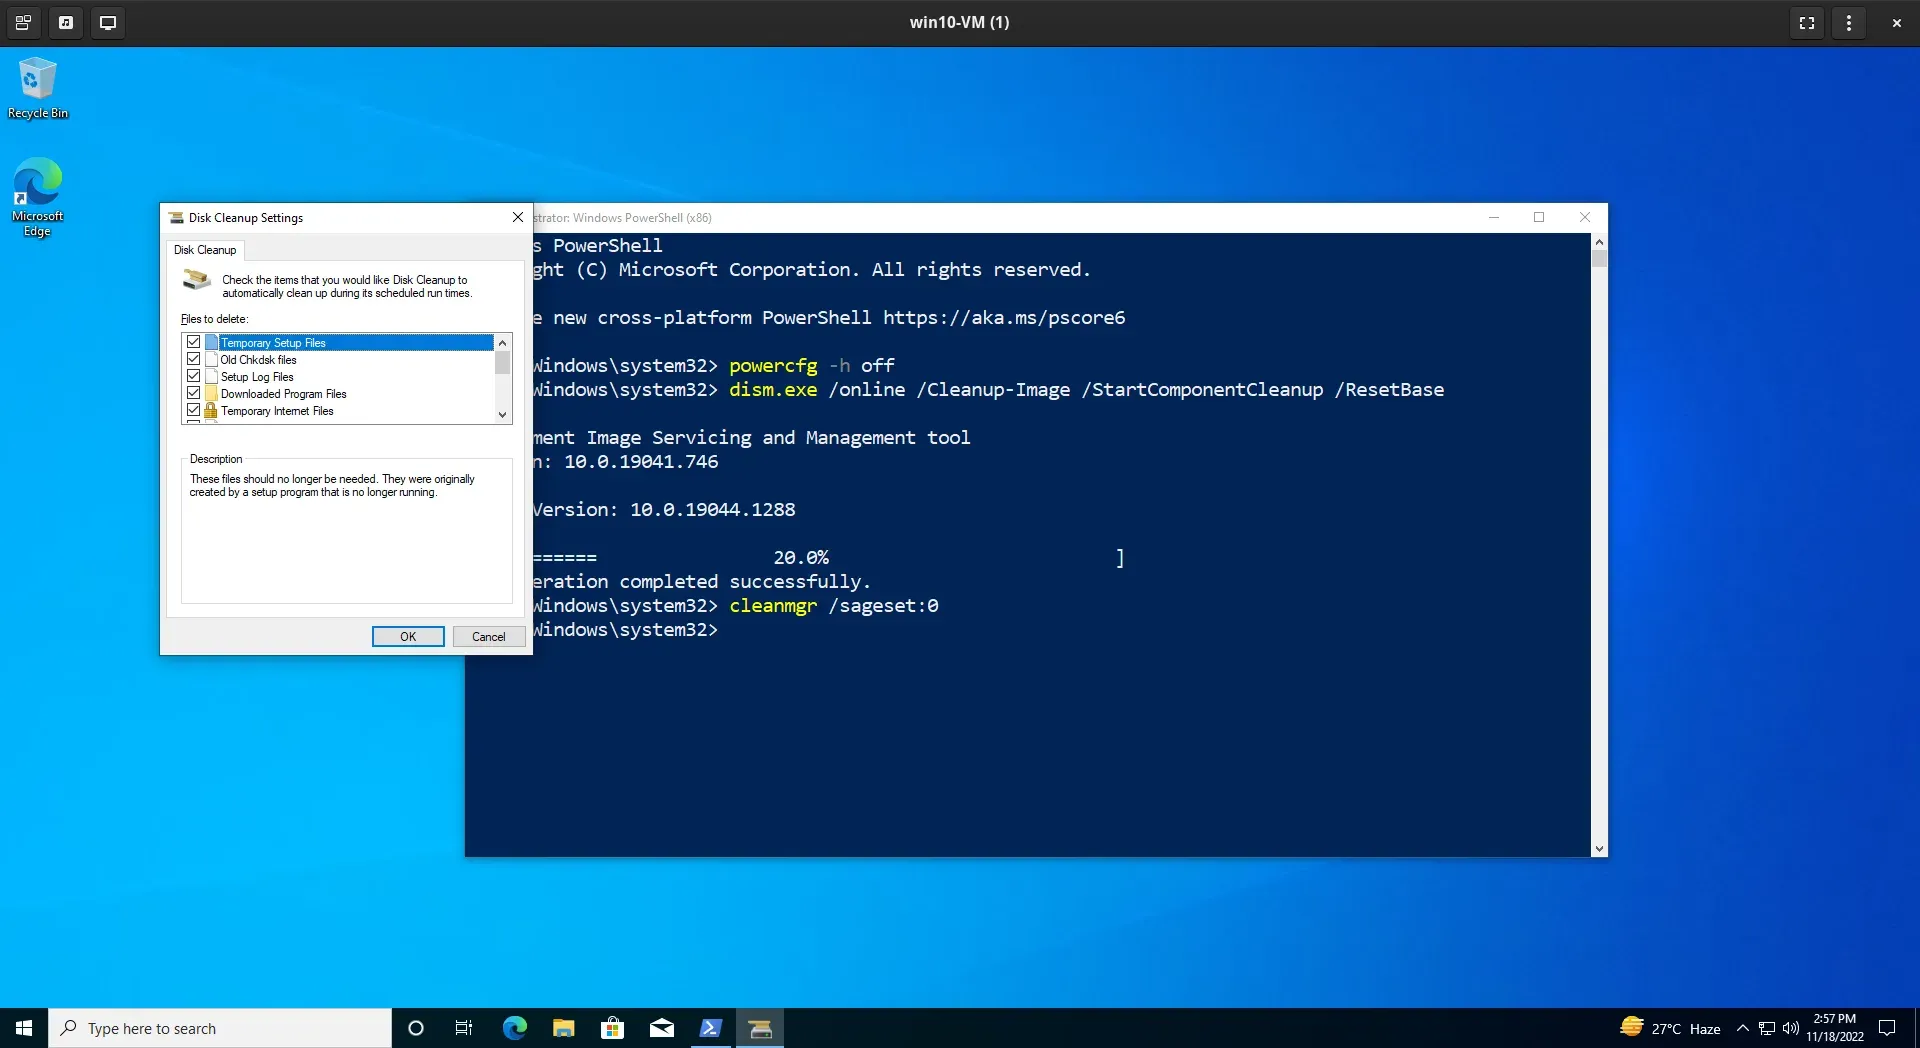
Execute the cleanup pass:
cleanmgr /sagerun:0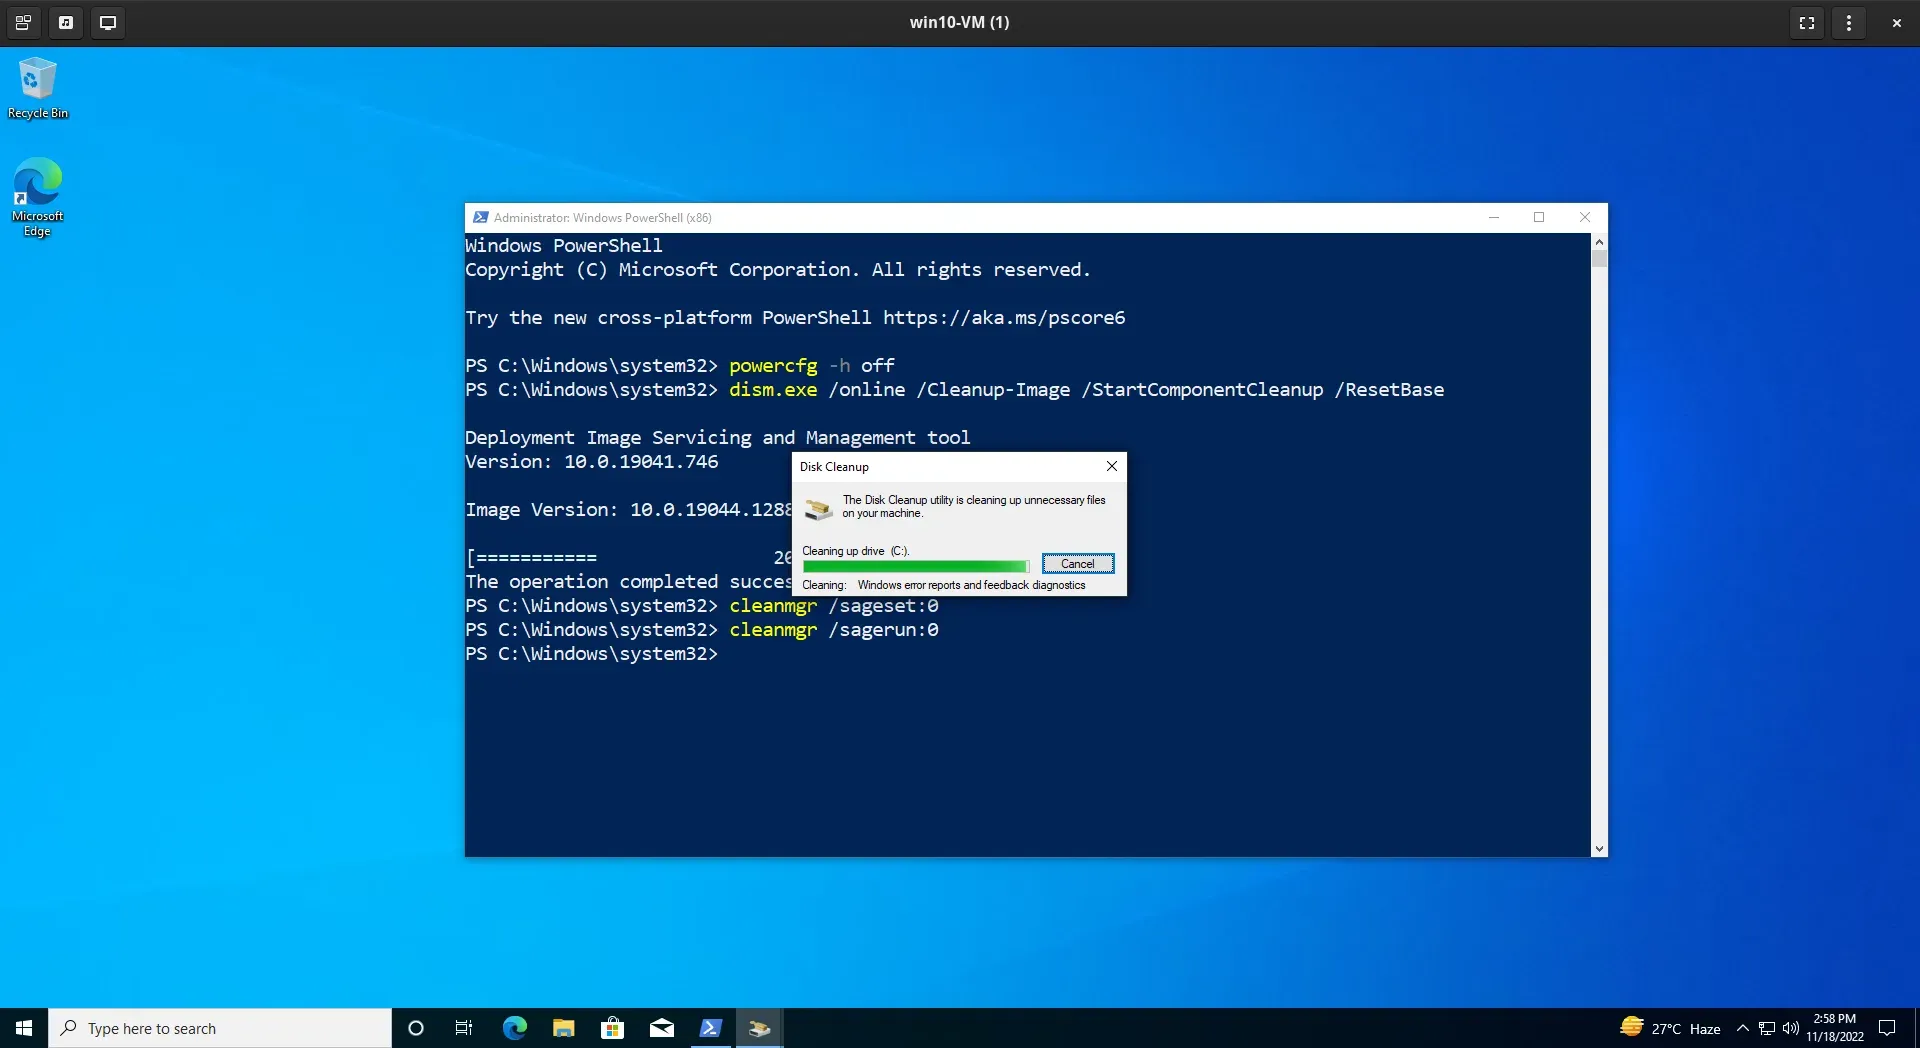
Trim and drive optimization
Run the Windows Drive Optimizer. When running over VirtIO SCSI with discard support, Windows detects the volume as a thin-provisioned drive and issues TRIM commands back to the host filesystem:
defrag C: /O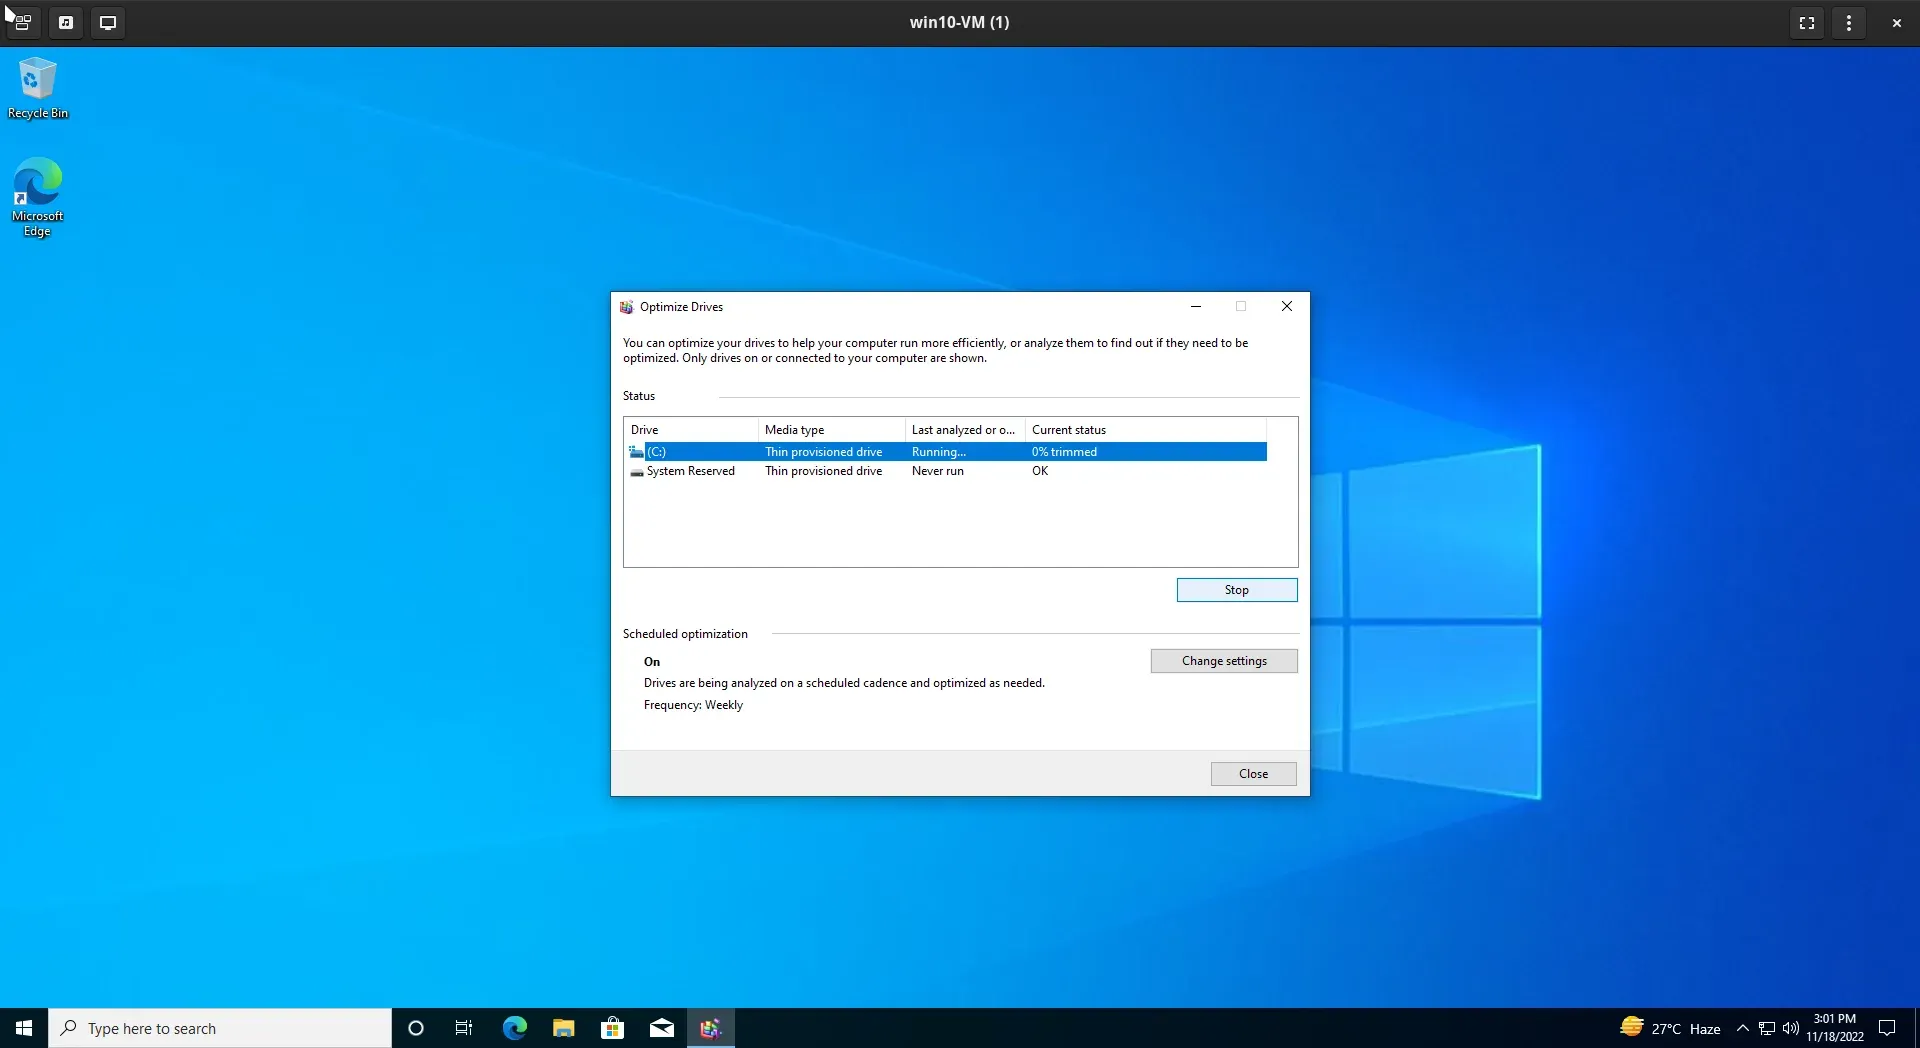
Backup and image lifecycle
Raw partition passthrough bypasses the host filesystem, which means libvirt internal snapshots are unavailable. A manual backup strategy replaces them.
Bit-for-bit partition backup
Ensure the guest is shut off, then copy the raw partition and compress:
#!/bin/bash
VM_NAME="windows-11"
SOURCE="/dev/disk/by-id/nvme-STABLE_ID_HERE-part2"
DESTINATION="/path/to/backup/windows-11-$(date +%F).img.gz"

if [ "$(virsh domstate $VM_NAME)" != "shut off" ]; then
    echo "Error: VM is running. Aborting backup."
    exit 1
fi

dd if="$SOURCE" bs=64K status=progress | gzip -c > "$DESTINATION"
Restoring into a portable qcow2
To convert a backup back into a portable image, decompress it first: qemu-img needs the input size, so a piped zcat fails:
gunzip -k windows-11-backup.img.gz
qemu-img convert -f raw -O qcow2 windows-11-backup.img windows-11.qcow2
Managing disk bloat
Before compressing, zero the free space from inside Windows with sdelete64.exe -z C: so the host sees zeros instead of stale data:
qemu-img convert -c -O qcow2 windows-11-bloated.qcow2 windows-11-lean.qcow2Operational review
With VirtIO drivers, Hyper-V enlightenments, pinned performance cores, hugepage backing, and passthrough storage applied, the Windows guest operates with low CPU baseline utilization, responsive graphics, and near-native disk access.
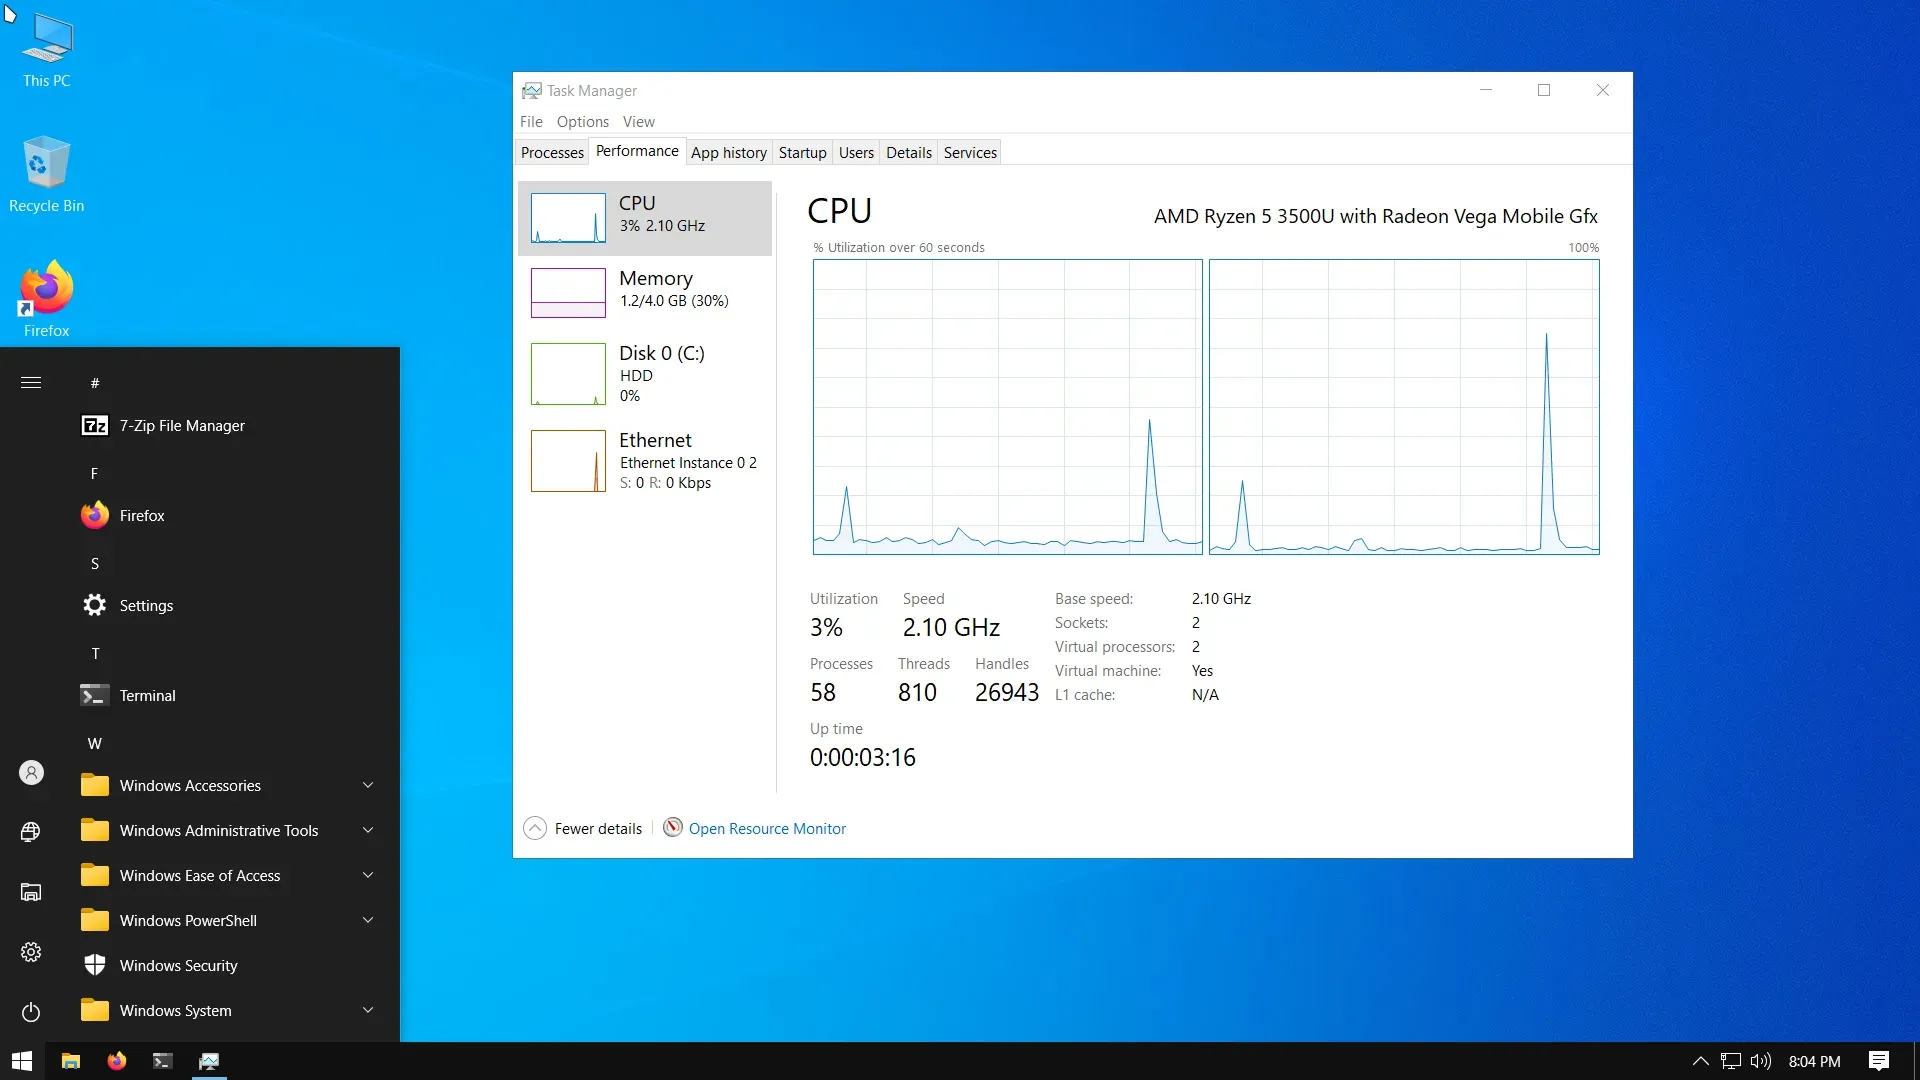
This architecture separates host resource management from guest execution: the scheduler stays off the guest cores, memory access avoids the TLB, storage skips the host filesystem, and the network spreads interrupts across every core. The result is a Windows environment suitable for development and productivity work, delivered indistinguishably from bare metal.
Discussion
Comments load from GitHub only when requested. The Article remains available if GitHub is blocked.Open Article discussions on GitHub.